Swanicyouth
New member
I thought I would start a thread regarding common vehicle maintenance & repairs - since I'm doing some. I'm hoping others will add to this when they get the chance. Basically, I do all my own maintenance repairs I can at home. Most of this stuff is pretty simple. It just takes some time, research, patience, and the correct tools. I do have a background as mechanic, but pretty much anyone without physical limitations can do most of this stuff.
A few rules I try to follow:
1. Always research what you are about to do if you have never done it before. The internet and car forums are a great resource for this. It's as simple as typing something like "BMW E46 strut replacement" (or whatever you are doing) into Google.
2. Always have the right tools on hand. You don't need the most expensive tools - just the correct tools for the correct job. Having to stop what you are doing to go out and buy a tool is not fun. If in doubt, buy it and save the receipt. If you don't use it - return it. A lot of places like Advance Auto have programs where you can "rent" a lot of specialty tools for free. You just have to buy them - then they refund your money 100% when you bring them back. This works well for a tool like a spring compressor or a ball joint press that you probably won't use very frequently. Most hand tools from Harbor Freight are cheap and work just fine for DIY type jobs. Since your DIYing it - you'll be saving a ton of money anyway - so spend some of it to get the right tools.
Anytime your doing anything where a bolt could possibly be seized by rust or corrosion, a simple plumbers torch can really save the day when all options fail. I can't tell you how many times I've tried almost anything and everything to get an old rusty or stripped bolt free and heating it up with a plumbers torch saved me from complete frustration. Acetylene & MAP gas torches work a little better than propane - but a plumbers torch usually will get the job done - and no oxygen is required. Cost is about ~ $20.
3. Have towels, rags, gloves,clean-up stuff and whatever ancillary supplies you will likely need on hand as well. When doing greasy stuff, I always have several bottle of Brake Kleen on hand as well. It degreases tools, bearings, spilled/dripped oil, and engine grime pretty much better than anything else out there that is readily available. The only caveat is that a can doesn't go very far.
4. Get any and every part you will think you could possibly need. Stuff like rivets, plugs, screws, bolts, etc... are easy to overlook. Depending on exactly what you are doing, a lot of times a bolt could break - or possibly even get lost. These parts can be ordered from a dealer and are usually pretty cheap. Nothing is worse than having a stripped bolt or snapped plastics rivets - only to find out they are dealer parts only - and the dealer has to order them. This could hold you up several days.
5. Buy the right parts and any ancillary parts that may be "once and done" to get to the right parts on your car. There is no point in trying to save a few bucks by reusing parts that have probably seen better days. So, if your doing something like a brake job - pick up the caliper pins, wear sensors, and brake hardware before you start. Again, these things are pretty cheap and can sometimes not be in the best shape once a car is several years old.
So, what I'm doing today is pretty easy. I'm changing the coolant/antifreeze, manual transmission fluid, differential fluid, & flushing the brake fluid. But, I'm guessing a BMW dealer would charge me well over $1200 to do this work. Doing it yourself is significantly cheaper and you are assured it's done correctly. My cost on the factory fluids & new drain plugs was about $300.
If you think $1200 is crazy to change some fluids - it's not. My friend just took his X5 to the local BMW dealer for state inspection. Car passed - except for one thing. It needed new wiper blades. The X5 has three. Total BMW dealer cost (including new blades) to replace them: $159. I'm guessing half was "parts" and half "labor".
Another point I'd like to bring up is DIY'ing it can assure that the correct factory fluids are used in your vehicle. While you would THINK a dealer would always use the manufacturer's factory fluids in a dealer setting - this is not always the case. I used to work at a dealer, and we RARELY used factory fluids. We used whatever the parts department bought in a 50 gallon drum. Oil was oil. Gear oil was gear oil. That was it. There were no weights or types. Nobody cared. Garages are even scarier to me. Not only will you likely not get factory fluids - but you may even get the wrong fluid. You may not even get the fluid you are paying for.
So, here are some of the tools to do this job:

Doing under car work requires jacking the car up. It's mandatory to use (a) jack stand(s) if your going to jack a car up - unless you want to die. Cars can slip off a jack in a second. Jacks can leak and bleed down. People have been killed this way. If jacking up one corner of the car - leave the vehicle's weight on the the jack and use the jack stand as a safety as well.
Here you can see what I mean. The car is on the jack at the jacking point and the jack stand is there as a safety (one wheel jacked up only):

Often times on newer (lower / sports ) cars it's a huge PIA to jack the car up and place it on a jack stand. This is because some cars have jacking points at four corners - and once they are jacked up - the jack is in the way of resting the car on the jack stand at the jacking point. BMWs are notorious for this. They have central jacking points as well, however most people don't have a jack long enough to access those points.
The best way I've found around this is to jack the car up by the crimp weld using a block of wood, like this:

I've been using this same block of wood for years for this purpose. While technically jacking most cars up by the crimp weld is a no-no, the block of wood disperse the weight on the jack and causes no damage if done correctly. This will allow you rest the car on jack stands at the jacking points if need be. I've done this numerous times without so much as a scratch.
To start...
*Changing Coolant / Antifreeze -
This is pretty easy. If you can jack up a car and unscrew a bolt you can do this. The trick is to have a big drain pan, something to lay on (besides the dirty ground), and even a tray for under the drain pan:

I always try to change fluids when they are warm (not hot). Obviously, you don't want to open a hot radiator. But, fluids tend to flow better when they are a bit warm. You want to get as much of the old fluid out as possible before adding the new stuff.
Most coolant comes neat and needs to be diluted. It's best to dilute coolant with distilled water. Usually the dilution ratio is about 50:50. So, you need to mix the coolant with water. This should be done before you add the coolant to the system IMHO - as once you add it you likely won't know how much you have added or you may have added more coolant than the system can fit water to dilute it. Then, you will never know if the ratio is correct.
For this reason, I never flush a cooling system with water. While you can get the systems capacity and try and figure out how much water is in there by adding half the system's capacity of coolant - this always seems to me more headaches than it's worth - as you will never know for sure if the system is 100% empty ( it's likely not) -'which will through off your ratio when adding the new stuff using the cooling system capacity method. I only ad / flush old coolant with new coolant diluted to the correct ratio.
First, find your coolant reservoir or overflow cap and remove it:

A lot of newer cars have plastic shields that must be removed to access drain plugs. These are the shields I am talking about:

These shields are usually easily removed by unscrewing a bunch of small bolts. The worse part about this is just having to lay on your back to do it. shield removed:

Then you want to drain the coolant out of the coolant drain - which is usually on the bottom of the radiator:

The coolant drain plug on most vehicles simply unscrews. It's also plastic now a days on most cars - so be careful not to break it or over tighten it. I'm sure someone someplace sells a special "BMW coolant plug tool" to do this, but I've found a chisel works well to remove this plug.

Let the coolant drain completely and then replace the drain plug underneath. A lot of cars also have coolant drains on the engine block. IMHO if your smart - you will not mess with this. Access to this may be difficult and damaging threads here could be catastrophic. Whenever you remove any plug - the possibility exists (albeit unlikely) that a leak could form as well. So, I would not touch the drain plug in the block. Instead, I just choose to spend the few extra bucks on extra coolant to change the coolant twice so 95%+ of the old stuff is removed.
Once the plug is reinstalled, just add you pre-diluted coolant until the system is full. Some new cars have a port to bleed the air out of the coolant separate from the over fill cap. The one on my car looks like this:

Again, if you are smart - I would not mess with this. While I'm sure one exists someplace - I've never had a car I couldn't bleed the cooling system from wherever it uses as the pressure cap. Bleeding the system simply entails letting the car run and letting the trapped air / bubbles come to the surface:

You want to keep an eye on the engine temperature and bring the car up to operating temperature - all while keeping an eye on the the coolant level. Once the thermostat opens - the level will drop a bit. Be ready to add more diluted coolant and to let the system bleed a few more minutes. Feeling the upper and lower radiator hoses can give you an idea when the thermostat opens. They should both feel equally as hot. Don't burn yourself here. Squeezing the hoses a bit can also help to bring any trapped air to the surface. Don't cut off your hand with the fan. Once you are confident all the air has left the system - replace the cap. Re-check the coolant level after driving a few miles with the car at operating temperature.
* Changing Differential & Manual Transmission Fluid:
Most cars today I believe come with "filled for life" differential and manual/automatic transmission fluid (but, not this car). Performance type cars may be the exception here. If your car is RWD - the job is pretty simple, albeit a PIA to crawl under the car and work on your back.
Basically a transmission (manual) and differential have ingot & out got plugs. You use the lowest plug to drain the fluid - and the higher plug to fill it. Filling it entails adding fluid until it starts to run out of the top plug hole. It sounds pretty easy, but like most things, there is a good way and a bad way to do it.
First you will need some type of pump or similar to pump the new fluid back in after the old fluid has been drained. Often times the upper fluid hole can be quite difficult to get to, so if your working on the ground - you will need extension tubing for your pump so it reaches to clear the car. I do this because I find it nearly IMPOSSIBLE to pump a fluid pump while laying on my back underneath a car that is touching my nose. You can get this tubing at any hardware store. I always get clear tubing - so I can see what is going in.
Secondly, avoid any pump that looks like this like the plague:

These pumps are what's usually available at Pep Boys and whatnot - but they are horrible. They leak fluid all over the place. They leak fluid out the back and out the sides. They are just bad. I believe they were put here as a plot by mechanic shops to torture DIY'ers into never wanting to touch their own cars.
This type of pump:

works pretty well, but is meant to fit on a gallon jug. It's limited in the volume of fluid it can pump quickly though quickly - as the pump mechanism isn't super efficient. But, you can use it without making a huge mess.
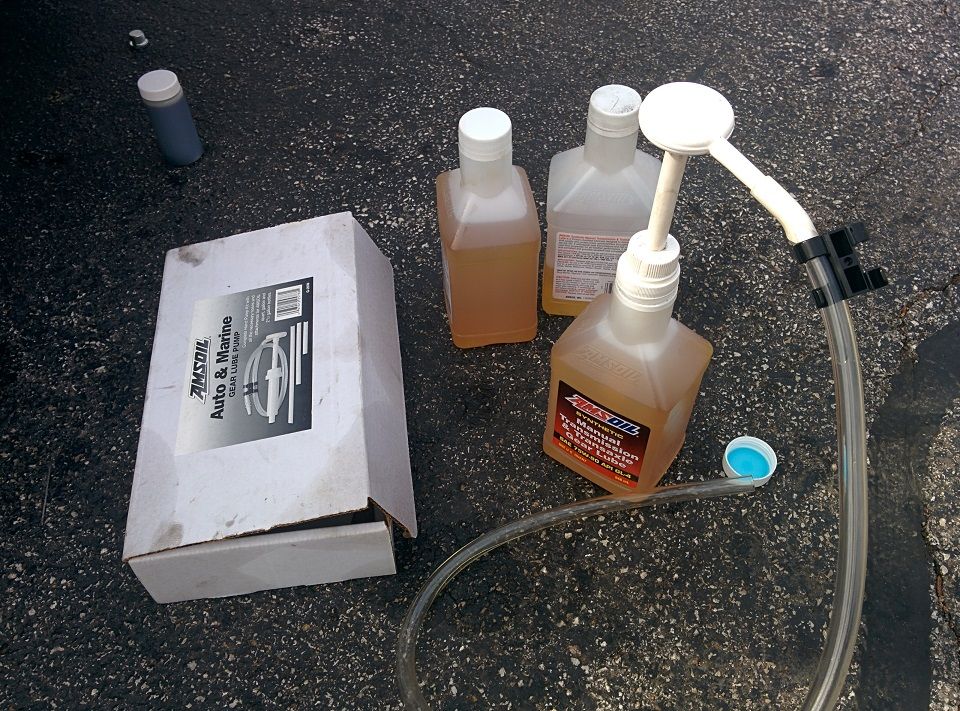
The best pump I've found is this one:

This pump doesn't leak a drop and can move a large volume of fluid quickly and easily. It also fits pretty much in any bottle - as it sort of has a rubber tapered seal.
A lot of times the fill hole in transmissions is smaller that the tubing that fits on a pump that can move a lot of fluid quickly. So, just get a smaller piece of tubing and make an adapter like this:

So, you have to take out the plugs and drain the fluid first. Always make sure the top (fill) plug can be loosened before taking out the bottom (drain) plug. Because, if the top plug is seized or stripped - once you drain your fluid out you will not be able to get new fluid in the top hole if you can't remove the plug. These thicker fluids are best drained when their temperature is warm to hot. I also replace the fill/drain plugs every 2 fluid changes. Not because I'm afraid they will leak - but because they are made out of aluminum here and are easy to strip the Allen socket head part.
Here is the top (fill) hole of the transmission:


As you can see, clearance is tight. Do anything possible not to strip this plug or you will likely be pulling the transmission.
The bottom plug is directly on the bottom middle of the transmission most of the times - and looks just like the top. Once your sure the top can be freed - remove the bottom plug and drain the fluid.
The trick here is to either jack the car up perfectly level; or to jack the car up, remove the plug, then lower the car on the oil tub - so ALL the old fluid comes out. If the car is angled, a puddle of old fluid can remain in the transmission and not drain (drain in center of transmission).
The trick to filling it properly is to jack the car up by the side the fill plug is on - that way the fill side will be a bit elevated - which will ensure you can get enough fluid in the hole before it starts to run out. I've done it both ways and found out the difference can be as much as a 1/3 of a quart. Which is a lot in a transmission that holds under 2 quarts.
Fill line going into transmission:

Assuming you have the car jacked up correctly, now you just pump in the fluid until it begins to run out and replace the fill plug.
Changing differential fluid is pretty similar. First I had to lower a shield:

The plugs here are both on the same side:

Again, you will need to jack up the car to gain access to the plugs - but you should lower the car flat or raise it by the opposite side of the drain plug (plug on side) - so all the fluid runs out (unless car is lifted evenly). Sometimes differential bolts get seized - which isn't too common with the aluminum type plugs used here. If the plugs are iron and the differential is iron - they can corrode together. Instead of pulling your hair out, heating them up with a plumbers torch will usually make them easy to remove.
Again, make sure top plug can be removed before you drain the fluid out:

Fluid drains:

Normally to refill the differential you can use either of the two good type pumps above. However, this BMW friction modified gear oil is crazy expensive at $50 a quart. Due to the cost, I'm skipping a pump here - as I need to get pretty much all 3 quarts 100% in the differential without waisting any fluid hanging up in the pump mechanism that I will not be able to pump in once the pump runs dry.
The bottles come with these little nipples on them:

So here, I simply attached some plastic hose long enough to reach outside the car (above the differential) so I could squeeze it in. When you do this you want to make sure the plastic hose is secure in the fill hole, or it can pop out and differential fluid will squirt all over. Try to rout the hose so it's above the fill hole - this will make it easier to pump the fluid in.
Routing of hose:

Squeezing the new fluid in. Always remember to replace you lower plug before you pump any fluid in or your fluid will end up on the floor.

Once the fluid starts to run out the fill hole - quickly replace the plug. I did this by jacking the vehicle up by the same side the fill hole is located on the differential while filling it. So, that side is elevated and you can get enough fluid in before it starts dripping out. Remove your fill hose and replace your fill plug and your done.
You can use a torque wrench to torque these bolts to factory specs if possible. I've been doing this long enough -'that I don't do it. Access may be almost impossible with a torque wrench to certain fill plugs as well. Basically, you want it tight - but not so tight your using your weight on the ratchet to tighten it.
*Changing Brake Fluid:
Brake fluid is often a neglected part of the vehicle. However, brake fluid can take on water from the atmosphere over time - causing all types of components in your braking system to fail. It should be changed every 2 years or so for regular DOT 3 or 4 type fluids. If you do this, it's very unlikely you will have a brake issue due to a hydraulic component's internal failure.
Before you actually do anything with brake hydraulics - the first thing you should do is check all the calipers and make sure the bleeders are not seized:

This is done by simply unscrewing the bleeder and making sure it's free.
Basically, changing brake fluid means beading out the old fluid with new fluid - while never letting the master cylinder run dry. Once the master cylinder runs dry you have air in the brake system - which may be easy or not so easy to get out. So, the best way I have found to do this without any headaches is to use the Motive Brake Bleeder.

It costs about $50 and is one of those tools that once you use - you will never want to do it the old way. Basically, you fill the reservoir in the bleeder with 2 quarts of new brake fluid. Then, you screw it to the top of your master cylinder like so:

Motive sells all sorts of adapters for all sorts of master cylinders - but the one it comes with is pretty common.
After that you pump the top lever up to about 10 psi and check the device is holding pressure and there is no leak.

Once you are assured the system is sealed, you start from the caliper farthest from the master cylinder (RR) and work towards the caliper closest to the master cylinder (LF). The Motive Bleeder is pumped to about 20 psi and each bleeder is opened until enough fluid is flushed through to get the old fluid out.
Since I'm using two quarts here (that is more than enough), basically I'm going to use the empty brake fluid containers as fluid catches for the old fluid. I can judge when each caliper has bled through approximately 1/2 a quart and move on to the next caliper.
All you have to do when the bleeder is hooked up is open the bleeder screws and let the fluid flow out. But, again - there is a good way and a bad way to do this. The bad way is just to open the bleeder and let it squirt all over you wheel wells, suspension, and floor. The good way is to use a piece of clear tubing that stretches over the bleeder nipple like so:

A few rules I try to follow:
1. Always research what you are about to do if you have never done it before. The internet and car forums are a great resource for this. It's as simple as typing something like "BMW E46 strut replacement" (or whatever you are doing) into Google.
2. Always have the right tools on hand. You don't need the most expensive tools - just the correct tools for the correct job. Having to stop what you are doing to go out and buy a tool is not fun. If in doubt, buy it and save the receipt. If you don't use it - return it. A lot of places like Advance Auto have programs where you can "rent" a lot of specialty tools for free. You just have to buy them - then they refund your money 100% when you bring them back. This works well for a tool like a spring compressor or a ball joint press that you probably won't use very frequently. Most hand tools from Harbor Freight are cheap and work just fine for DIY type jobs. Since your DIYing it - you'll be saving a ton of money anyway - so spend some of it to get the right tools.
Anytime your doing anything where a bolt could possibly be seized by rust or corrosion, a simple plumbers torch can really save the day when all options fail. I can't tell you how many times I've tried almost anything and everything to get an old rusty or stripped bolt free and heating it up with a plumbers torch saved me from complete frustration. Acetylene & MAP gas torches work a little better than propane - but a plumbers torch usually will get the job done - and no oxygen is required. Cost is about ~ $20.
3. Have towels, rags, gloves,clean-up stuff and whatever ancillary supplies you will likely need on hand as well. When doing greasy stuff, I always have several bottle of Brake Kleen on hand as well. It degreases tools, bearings, spilled/dripped oil, and engine grime pretty much better than anything else out there that is readily available. The only caveat is that a can doesn't go very far.
4. Get any and every part you will think you could possibly need. Stuff like rivets, plugs, screws, bolts, etc... are easy to overlook. Depending on exactly what you are doing, a lot of times a bolt could break - or possibly even get lost. These parts can be ordered from a dealer and are usually pretty cheap. Nothing is worse than having a stripped bolt or snapped plastics rivets - only to find out they are dealer parts only - and the dealer has to order them. This could hold you up several days.
5. Buy the right parts and any ancillary parts that may be "once and done" to get to the right parts on your car. There is no point in trying to save a few bucks by reusing parts that have probably seen better days. So, if your doing something like a brake job - pick up the caliper pins, wear sensors, and brake hardware before you start. Again, these things are pretty cheap and can sometimes not be in the best shape once a car is several years old.
So, what I'm doing today is pretty easy. I'm changing the coolant/antifreeze, manual transmission fluid, differential fluid, & flushing the brake fluid. But, I'm guessing a BMW dealer would charge me well over $1200 to do this work. Doing it yourself is significantly cheaper and you are assured it's done correctly. My cost on the factory fluids & new drain plugs was about $300.
If you think $1200 is crazy to change some fluids - it's not. My friend just took his X5 to the local BMW dealer for state inspection. Car passed - except for one thing. It needed new wiper blades. The X5 has three. Total BMW dealer cost (including new blades) to replace them: $159. I'm guessing half was "parts" and half "labor".
Another point I'd like to bring up is DIY'ing it can assure that the correct factory fluids are used in your vehicle. While you would THINK a dealer would always use the manufacturer's factory fluids in a dealer setting - this is not always the case. I used to work at a dealer, and we RARELY used factory fluids. We used whatever the parts department bought in a 50 gallon drum. Oil was oil. Gear oil was gear oil. That was it. There were no weights or types. Nobody cared. Garages are even scarier to me. Not only will you likely not get factory fluids - but you may even get the wrong fluid. You may not even get the fluid you are paying for.
So, here are some of the tools to do this job:
Doing under car work requires jacking the car up. It's mandatory to use (a) jack stand(s) if your going to jack a car up - unless you want to die. Cars can slip off a jack in a second. Jacks can leak and bleed down. People have been killed this way. If jacking up one corner of the car - leave the vehicle's weight on the the jack and use the jack stand as a safety as well.
Here you can see what I mean. The car is on the jack at the jacking point and the jack stand is there as a safety (one wheel jacked up only):
Often times on newer (lower / sports ) cars it's a huge PIA to jack the car up and place it on a jack stand. This is because some cars have jacking points at four corners - and once they are jacked up - the jack is in the way of resting the car on the jack stand at the jacking point. BMWs are notorious for this. They have central jacking points as well, however most people don't have a jack long enough to access those points.
The best way I've found around this is to jack the car up by the crimp weld using a block of wood, like this:
I've been using this same block of wood for years for this purpose. While technically jacking most cars up by the crimp weld is a no-no, the block of wood disperse the weight on the jack and causes no damage if done correctly. This will allow you rest the car on jack stands at the jacking points if need be. I've done this numerous times without so much as a scratch.
To start...
*Changing Coolant / Antifreeze -
This is pretty easy. If you can jack up a car and unscrew a bolt you can do this. The trick is to have a big drain pan, something to lay on (besides the dirty ground), and even a tray for under the drain pan:
I always try to change fluids when they are warm (not hot). Obviously, you don't want to open a hot radiator. But, fluids tend to flow better when they are a bit warm. You want to get as much of the old fluid out as possible before adding the new stuff.
Most coolant comes neat and needs to be diluted. It's best to dilute coolant with distilled water. Usually the dilution ratio is about 50:50. So, you need to mix the coolant with water. This should be done before you add the coolant to the system IMHO - as once you add it you likely won't know how much you have added or you may have added more coolant than the system can fit water to dilute it. Then, you will never know if the ratio is correct.
For this reason, I never flush a cooling system with water. While you can get the systems capacity and try and figure out how much water is in there by adding half the system's capacity of coolant - this always seems to me more headaches than it's worth - as you will never know for sure if the system is 100% empty ( it's likely not) -'which will through off your ratio when adding the new stuff using the cooling system capacity method. I only ad / flush old coolant with new coolant diluted to the correct ratio.
First, find your coolant reservoir or overflow cap and remove it:
A lot of newer cars have plastic shields that must be removed to access drain plugs. These are the shields I am talking about:
These shields are usually easily removed by unscrewing a bunch of small bolts. The worse part about this is just having to lay on your back to do it. shield removed:
Then you want to drain the coolant out of the coolant drain - which is usually on the bottom of the radiator:
The coolant drain plug on most vehicles simply unscrews. It's also plastic now a days on most cars - so be careful not to break it or over tighten it. I'm sure someone someplace sells a special "BMW coolant plug tool" to do this, but I've found a chisel works well to remove this plug.
Let the coolant drain completely and then replace the drain plug underneath. A lot of cars also have coolant drains on the engine block. IMHO if your smart - you will not mess with this. Access to this may be difficult and damaging threads here could be catastrophic. Whenever you remove any plug - the possibility exists (albeit unlikely) that a leak could form as well. So, I would not touch the drain plug in the block. Instead, I just choose to spend the few extra bucks on extra coolant to change the coolant twice so 95%+ of the old stuff is removed.
Once the plug is reinstalled, just add you pre-diluted coolant until the system is full. Some new cars have a port to bleed the air out of the coolant separate from the over fill cap. The one on my car looks like this:
Again, if you are smart - I would not mess with this. While I'm sure one exists someplace - I've never had a car I couldn't bleed the cooling system from wherever it uses as the pressure cap. Bleeding the system simply entails letting the car run and letting the trapped air / bubbles come to the surface:
You want to keep an eye on the engine temperature and bring the car up to operating temperature - all while keeping an eye on the the coolant level. Once the thermostat opens - the level will drop a bit. Be ready to add more diluted coolant and to let the system bleed a few more minutes. Feeling the upper and lower radiator hoses can give you an idea when the thermostat opens. They should both feel equally as hot. Don't burn yourself here. Squeezing the hoses a bit can also help to bring any trapped air to the surface. Don't cut off your hand with the fan. Once you are confident all the air has left the system - replace the cap. Re-check the coolant level after driving a few miles with the car at operating temperature.
* Changing Differential & Manual Transmission Fluid:
Most cars today I believe come with "filled for life" differential and manual/automatic transmission fluid (but, not this car). Performance type cars may be the exception here. If your car is RWD - the job is pretty simple, albeit a PIA to crawl under the car and work on your back.
Basically a transmission (manual) and differential have ingot & out got plugs. You use the lowest plug to drain the fluid - and the higher plug to fill it. Filling it entails adding fluid until it starts to run out of the top plug hole. It sounds pretty easy, but like most things, there is a good way and a bad way to do it.
First you will need some type of pump or similar to pump the new fluid back in after the old fluid has been drained. Often times the upper fluid hole can be quite difficult to get to, so if your working on the ground - you will need extension tubing for your pump so it reaches to clear the car. I do this because I find it nearly IMPOSSIBLE to pump a fluid pump while laying on my back underneath a car that is touching my nose. You can get this tubing at any hardware store. I always get clear tubing - so I can see what is going in.
Secondly, avoid any pump that looks like this like the plague:
These pumps are what's usually available at Pep Boys and whatnot - but they are horrible. They leak fluid all over the place. They leak fluid out the back and out the sides. They are just bad. I believe they were put here as a plot by mechanic shops to torture DIY'ers into never wanting to touch their own cars.
This type of pump:
works pretty well, but is meant to fit on a gallon jug. It's limited in the volume of fluid it can pump quickly though quickly - as the pump mechanism isn't super efficient. But, you can use it without making a huge mess.
The best pump I've found is this one:
This pump doesn't leak a drop and can move a large volume of fluid quickly and easily. It also fits pretty much in any bottle - as it sort of has a rubber tapered seal.
A lot of times the fill hole in transmissions is smaller that the tubing that fits on a pump that can move a lot of fluid quickly. So, just get a smaller piece of tubing and make an adapter like this:
So, you have to take out the plugs and drain the fluid first. Always make sure the top (fill) plug can be loosened before taking out the bottom (drain) plug. Because, if the top plug is seized or stripped - once you drain your fluid out you will not be able to get new fluid in the top hole if you can't remove the plug. These thicker fluids are best drained when their temperature is warm to hot. I also replace the fill/drain plugs every 2 fluid changes. Not because I'm afraid they will leak - but because they are made out of aluminum here and are easy to strip the Allen socket head part.
Here is the top (fill) hole of the transmission:
As you can see, clearance is tight. Do anything possible not to strip this plug or you will likely be pulling the transmission.
The bottom plug is directly on the bottom middle of the transmission most of the times - and looks just like the top. Once your sure the top can be freed - remove the bottom plug and drain the fluid.
The trick here is to either jack the car up perfectly level; or to jack the car up, remove the plug, then lower the car on the oil tub - so ALL the old fluid comes out. If the car is angled, a puddle of old fluid can remain in the transmission and not drain (drain in center of transmission).
The trick to filling it properly is to jack the car up by the side the fill plug is on - that way the fill side will be a bit elevated - which will ensure you can get enough fluid in the hole before it starts to run out. I've done it both ways and found out the difference can be as much as a 1/3 of a quart. Which is a lot in a transmission that holds under 2 quarts.
Fill line going into transmission:
Assuming you have the car jacked up correctly, now you just pump in the fluid until it begins to run out and replace the fill plug.
Changing differential fluid is pretty similar. First I had to lower a shield:
The plugs here are both on the same side:
Again, you will need to jack up the car to gain access to the plugs - but you should lower the car flat or raise it by the opposite side of the drain plug (plug on side) - so all the fluid runs out (unless car is lifted evenly). Sometimes differential bolts get seized - which isn't too common with the aluminum type plugs used here. If the plugs are iron and the differential is iron - they can corrode together. Instead of pulling your hair out, heating them up with a plumbers torch will usually make them easy to remove.
Again, make sure top plug can be removed before you drain the fluid out:
Fluid drains:
Normally to refill the differential you can use either of the two good type pumps above. However, this BMW friction modified gear oil is crazy expensive at $50 a quart. Due to the cost, I'm skipping a pump here - as I need to get pretty much all 3 quarts 100% in the differential without waisting any fluid hanging up in the pump mechanism that I will not be able to pump in once the pump runs dry.
The bottles come with these little nipples on them:
So here, I simply attached some plastic hose long enough to reach outside the car (above the differential) so I could squeeze it in. When you do this you want to make sure the plastic hose is secure in the fill hole, or it can pop out and differential fluid will squirt all over. Try to rout the hose so it's above the fill hole - this will make it easier to pump the fluid in.
Routing of hose:
Squeezing the new fluid in. Always remember to replace you lower plug before you pump any fluid in or your fluid will end up on the floor.
Once the fluid starts to run out the fill hole - quickly replace the plug. I did this by jacking the vehicle up by the same side the fill hole is located on the differential while filling it. So, that side is elevated and you can get enough fluid in before it starts dripping out. Remove your fill hose and replace your fill plug and your done.
You can use a torque wrench to torque these bolts to factory specs if possible. I've been doing this long enough -'that I don't do it. Access may be almost impossible with a torque wrench to certain fill plugs as well. Basically, you want it tight - but not so tight your using your weight on the ratchet to tighten it.
*Changing Brake Fluid:
Brake fluid is often a neglected part of the vehicle. However, brake fluid can take on water from the atmosphere over time - causing all types of components in your braking system to fail. It should be changed every 2 years or so for regular DOT 3 or 4 type fluids. If you do this, it's very unlikely you will have a brake issue due to a hydraulic component's internal failure.
Before you actually do anything with brake hydraulics - the first thing you should do is check all the calipers and make sure the bleeders are not seized:
This is done by simply unscrewing the bleeder and making sure it's free.
Basically, changing brake fluid means beading out the old fluid with new fluid - while never letting the master cylinder run dry. Once the master cylinder runs dry you have air in the brake system - which may be easy or not so easy to get out. So, the best way I have found to do this without any headaches is to use the Motive Brake Bleeder.
It costs about $50 and is one of those tools that once you use - you will never want to do it the old way. Basically, you fill the reservoir in the bleeder with 2 quarts of new brake fluid. Then, you screw it to the top of your master cylinder like so:
Motive sells all sorts of adapters for all sorts of master cylinders - but the one it comes with is pretty common.
After that you pump the top lever up to about 10 psi and check the device is holding pressure and there is no leak.
Once you are assured the system is sealed, you start from the caliper farthest from the master cylinder (RR) and work towards the caliper closest to the master cylinder (LF). The Motive Bleeder is pumped to about 20 psi and each bleeder is opened until enough fluid is flushed through to get the old fluid out.
Since I'm using two quarts here (that is more than enough), basically I'm going to use the empty brake fluid containers as fluid catches for the old fluid. I can judge when each caliper has bled through approximately 1/2 a quart and move on to the next caliper.
All you have to do when the bleeder is hooked up is open the bleeder screws and let the fluid flow out. But, again - there is a good way and a bad way to do this. The bad way is just to open the bleeder and let it squirt all over you wheel wells, suspension, and floor. The good way is to use a piece of clear tubing that stretches over the bleeder nipple like so:


")