heatgain
Neutral & Detached
Time: 11:35 - 1:15/1 hour, 40 minutes
Vehicle: 2002 Honda Accord, red
Headlights: Hazed, cloudy
Materials Used: Meguiar’s #17, Meguiar’s #10, PlastX, Optimum Polish, Optimum Compound, Meguair’s #105, ColorX, 4� yellow and orange Cyclo pads, 4� white CCS pad, PB S&W, alcohol, painter’s tape, terrycloth towels, and Krylon UV-Resistant Clear.
I offered to do a co-worker’s hazed headlights at no charge to practice my restoration procedures and experiment with a final coat. I also wanted to attempt my procedures with a cordless drill instead of a DA, planning to go mobile for most headlight restorations.
My procedure was to use the least aggressive method/product first, working my way up in aggressiveness if necessary.
I used the orange Cyclo pad before using the yellow because yellow is described in print as more aggressive than orange. But feeling both after cleaning them, it feels like the orange is more aggressive than yellow. The orange feels rougher and is harder to compress with my fingers. I’m not yet sure to believe the prints ads or my tactile sense.
I used 4� pads and a 3� rotary backplate, driven by a cordless drill.
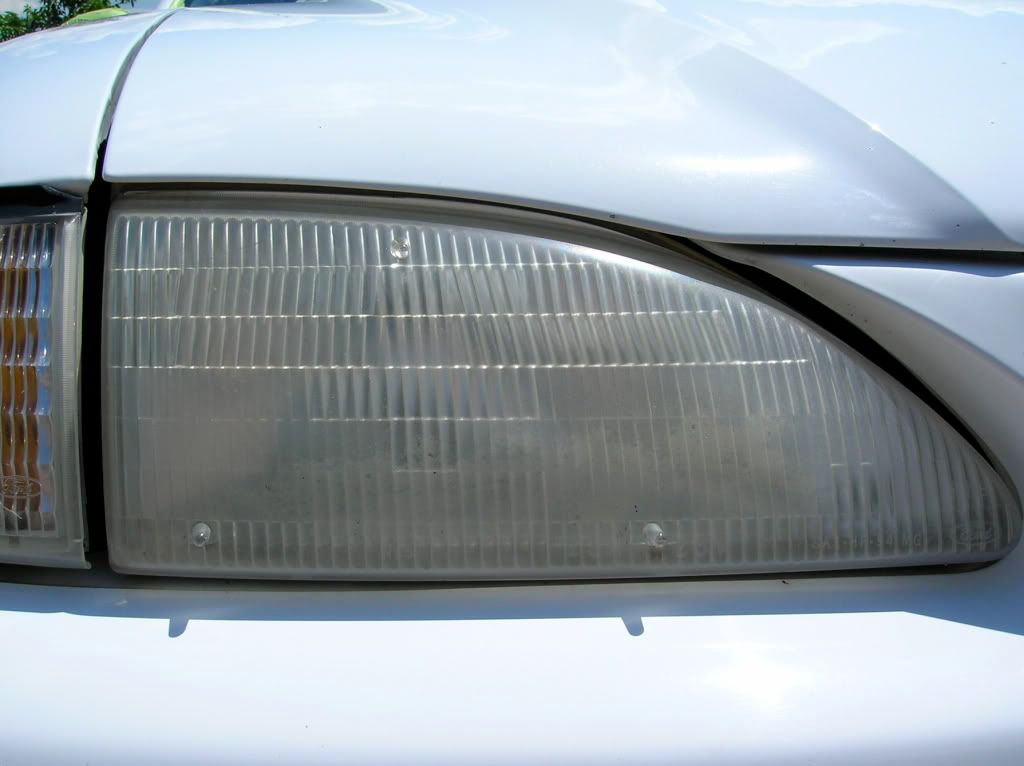
Here’s what the lenses looked like upon arrival.


I started by cleaning the dirty lenses with Poorboy’s S&W. I then taped off the headlights to protect the surrounding paint


Using an orange 4� Cyclo pad and a cordless drill, I applied Meguiar’s #17 Plastic Cleaner.


The lenses looked much better, but still hazed a bit.
Next, using the orange Cyclo pad, I polished with Meguiar’s #10 Plastic Polish.


An improvement, but still hazed. I was aiming for clarity.
Following my least to most aggressiveness plan, I then used Meguair’s PlastX, still with an orange Cyclo pad.


The lenses still had some haziness in spots, so I soldiered on.
I then used Optimum Polish, the one with the gold “New Formula� sticker on it. I first used the orange pad, and then moved up the aggressive scale by using the yellow Cyclo pad.


Still, some haze remains.
I moved on up to Optimum Compound, the “old formula,� still using a yellow Cyclo pad.


I’m not sure I accomplished anything with this step. I didn’t see any difference from the previous step. It could be because the OP was “New Formula,� and the OC was old formula. Or it could be because I’m an old man and don’t see so well anymore.
I then upped the ante and whipped out the Meguiar’s 105. I also changed from the cordless drill to the G-100 DA, speed 5. I used a 4� Cyclo yellow pad.


This step made me smile. Now the lenses looked good and clear to me. Perhaps I should have started with M105 in the first place? I’m aware that using the G-100 instead of the drill also made a difference, but by that time my 2nd drill battery was getting weaker and left me no choice.
I was satisfied enough with the clarity of the lenses now, and, with trepidation, picked up my newly purchased can of Krylon UV-Resistant Clear (gloss). I had great hopes for this final step. I thought I had found the perfect final coat for headlight lenses, at least according to what I had read about this product.
A blurb from an ad: “Krylon has created an excellent spray that will help protect against harmful UV light rays. It is a non-yellowing permanent coating that dries in minutes. It is even moisture resistant. It can be used on photography, paper, painted surfaces, wood, metal, plastic, papier mache, glass, plaster, ceramic, dried and silk flowers, wicker and more!�
When I first laid the coat on a test spot on the driver’s lens, it looked great. Clear & glossy. So I went ahead and sprayed a coat on both lenses.


However, although it looked great when I first sprayed it, it hazed a bit as it dried. Haze-wise, it threw me backward a couple of steps. I decided against a planned second coat on each lens.
I decided to try and improve the looks and clarity by using Meguiar’s ColorX on a 4� white CCS pad on the DA.


Eureka! It worked! It restored clarity to the lenses and left behind some protection. Whether I removed the Krylon coat with this procedure or just improved the clarity of it, I’m not sure.
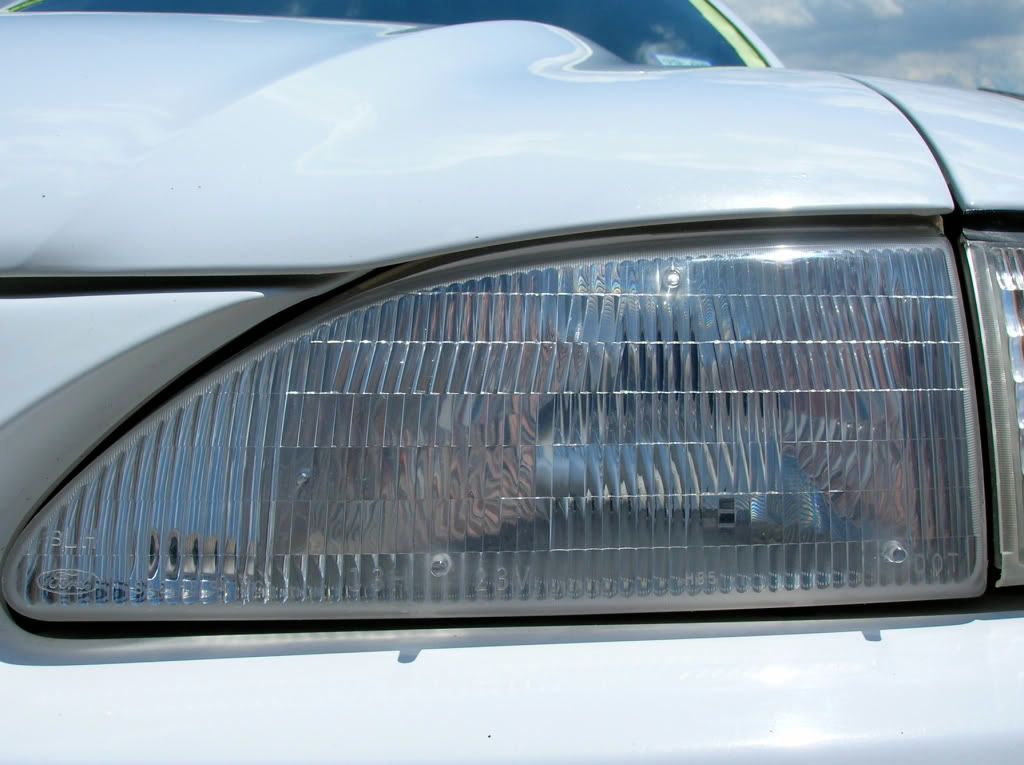
Here are some additional pics of the finished job. Although I am not 100% pleased with the final outcome, I learned a few things and formed some new questions.


My search continues to find the “perfect� procedure and sealant for headlight restoration, for working both on-site and at my fixed location.
Thanks for looking.
Comments and suggestions welcome.
Vehicle: 2002 Honda Accord, red
Headlights: Hazed, cloudy
Materials Used: Meguiar’s #17, Meguiar’s #10, PlastX, Optimum Polish, Optimum Compound, Meguair’s #105, ColorX, 4� yellow and orange Cyclo pads, 4� white CCS pad, PB S&W, alcohol, painter’s tape, terrycloth towels, and Krylon UV-Resistant Clear.
I offered to do a co-worker’s hazed headlights at no charge to practice my restoration procedures and experiment with a final coat. I also wanted to attempt my procedures with a cordless drill instead of a DA, planning to go mobile for most headlight restorations.
My procedure was to use the least aggressive method/product first, working my way up in aggressiveness if necessary.
I used the orange Cyclo pad before using the yellow because yellow is described in print as more aggressive than orange. But feeling both after cleaning them, it feels like the orange is more aggressive than yellow. The orange feels rougher and is harder to compress with my fingers. I’m not yet sure to believe the prints ads or my tactile sense.
I used 4� pads and a 3� rotary backplate, driven by a cordless drill.
Here’s what the lenses looked like upon arrival.
I started by cleaning the dirty lenses with Poorboy’s S&W. I then taped off the headlights to protect the surrounding paint
Using an orange 4� Cyclo pad and a cordless drill, I applied Meguiar’s #17 Plastic Cleaner.
The lenses looked much better, but still hazed a bit.
Next, using the orange Cyclo pad, I polished with Meguiar’s #10 Plastic Polish.
An improvement, but still hazed. I was aiming for clarity.
Following my least to most aggressiveness plan, I then used Meguair’s PlastX, still with an orange Cyclo pad.
The lenses still had some haziness in spots, so I soldiered on.
I then used Optimum Polish, the one with the gold “New Formula� sticker on it. I first used the orange pad, and then moved up the aggressive scale by using the yellow Cyclo pad.
Still, some haze remains.
I moved on up to Optimum Compound, the “old formula,� still using a yellow Cyclo pad.
I’m not sure I accomplished anything with this step. I didn’t see any difference from the previous step. It could be because the OP was “New Formula,� and the OC was old formula. Or it could be because I’m an old man and don’t see so well anymore.
I then upped the ante and whipped out the Meguiar’s 105. I also changed from the cordless drill to the G-100 DA, speed 5. I used a 4� Cyclo yellow pad.
This step made me smile. Now the lenses looked good and clear to me. Perhaps I should have started with M105 in the first place? I’m aware that using the G-100 instead of the drill also made a difference, but by that time my 2nd drill battery was getting weaker and left me no choice.
I was satisfied enough with the clarity of the lenses now, and, with trepidation, picked up my newly purchased can of Krylon UV-Resistant Clear (gloss). I had great hopes for this final step. I thought I had found the perfect final coat for headlight lenses, at least according to what I had read about this product.
A blurb from an ad: “Krylon has created an excellent spray that will help protect against harmful UV light rays. It is a non-yellowing permanent coating that dries in minutes. It is even moisture resistant. It can be used on photography, paper, painted surfaces, wood, metal, plastic, papier mache, glass, plaster, ceramic, dried and silk flowers, wicker and more!�
When I first laid the coat on a test spot on the driver’s lens, it looked great. Clear & glossy. So I went ahead and sprayed a coat on both lenses.
However, although it looked great when I first sprayed it, it hazed a bit as it dried. Haze-wise, it threw me backward a couple of steps. I decided against a planned second coat on each lens.
I decided to try and improve the looks and clarity by using Meguiar’s ColorX on a 4� white CCS pad on the DA.
Eureka! It worked! It restored clarity to the lenses and left behind some protection. Whether I removed the Krylon coat with this procedure or just improved the clarity of it, I’m not sure.
Here are some additional pics of the finished job. Although I am not 100% pleased with the final outcome, I learned a few things and formed some new questions.
My search continues to find the “perfect� procedure and sealant for headlight restoration, for working both on-site and at my fixed location.
Thanks for looking.
Comments and suggestions welcome.
")
 It's been a while