

We have had threads about wheel wells, but what about the bottom. Did a little thread searching, must not be looking for the correct words!
Can`t help notice on the Lexus once I can see around the Klasse shine my exhaust is not as sharp as I like.
No fancy chrome or anything just good old stock bottom.
Lots of plastic so I`m going to try my new EF Hi then apply the wheel well concept, extra vinyl cleaners laying around.
What about the exhaust? In the past I`ve used some of the foaming wheel cleaners, seemed to work.
Any ideas?
Results 1 to 15 of 56
-
01-20-2002, 12:00 AM #1


- Join Date
- Mar 2009
- Posts
- 565
- Post Thanks / Like

-
01-20-2002, 12:03 AM #2
- Join Date
- Mar 2001
- Location
- Keokuk, Iowa
- Posts
- 3,438
- Post Thanks / Like
Nope, lived out there toooooo long, know better, so will refrain from getting into this one.
Ketch"Logic dictates I have been at this detailing thing way too many years!":wink1:
-
01-20-2002, 04:26 AM #3
- Join Date
- Nov 2001
- Location
- In the garage(Logansport, IN)
- Posts
- 3,081
- Post Thanks / Like
I have done the Bottom of the SS in the past, it is more of a garage queen than a daily driver.. I washed and cleaned all the underside from the nose to the back bumper.. Then I polished the exhaust tips and the muffler. I did this last winter while the car is not getting drivin at all. If you do decide to do it, take your time but be ready to cry the first time your caught in the rain or a dusty road
 I know! I have pics somewhere on a CD, Maybe I will look for them
 DEDICATED TO THE PURPOSE BEYOND REASON... Oakley ..
Bill 97 Camaro SS #1422
-
01-20-2002, 10:16 AM #4
- Join Date
- Mar 2009
- Posts
- 245
- Post Thanks / Like
My truck sits up kinda high so you can see the rear axle,the frame from the side and the front suspension so I lay on the wet ground and wash everything I can get to..it makes the truck look new to me and if you see alot of dirt under the truck it just does`nt seem clean.I use 50/50 water and alcohol to clean the exaust tip and muffler keeps it looking new.
-
01-20-2002, 11:45 AM #5Super Moderator


- Join Date
- Dec 2001
- Location
- Middletown, Delaware
- Posts
- 13,582
- Post Thanks / Like
I do. Sorry I wanted to show you guys this. It the suspension on my show car (1990 300ZX). Trust me I spent many hours under this thing detailing, painting, chroming and powdercoating. It nice to display at the shows with a mirror.
http://zdriver.com/rides/showpic.php...1010321181.jpgOnly Z Best Detailing-Automotive Concours Detailing Services
http://ozbdetailing.com
https://www.facebook.com/ozbautodetailing
-
01-20-2002, 01:10 PM #6
- Join Date
- Mar 2009
- Posts
- 565
- Post Thanks / Like
Very nice Pats.
-
01-20-2002, 01:43 PM #7
- Join Date
- Mar 2009
- Posts
- 2,022
- Post Thanks / Like
I, I, I have also. But I am trying to not to detail it any more... detailing is a good hobby for me, but I`m not dedicating my life making sure that there isn`t any dust underneath my daily driver.
As with products, old rags and brushes along with Dawn and Brad`s favorite brake parts cleaner worked really well for me. Use AIO on any painted or smooth parts, and a reasonably priced PDMS dressing such as ArmorAll Interior Protectant or E1 Concours on any plastic and vinyl. Rhino ramps work very well too... good for oil changes. :up
~bw
-
01-20-2002, 03:23 PM #8
- Join Date
- Mar 2009
- Posts
- 565
- Post Thanks / Like
Just to clarify, really looking for something to spray on the exhaust. It`s not chrome just matte looking metal. Do not want to spend much time with it. So far today I sprayed some EF HI on it and that took a lot of the dirt (not that much to begin with) off.
Was eyeballing my Eagle Wet tire dressing, but it does say combustible????
-
01-20-2002, 03:28 PM #9
- Join Date
- Aug 2001
- Location
- Cincinnati, OH
- Posts
- 4,341
- Post Thanks / Like
To clean and polish it try something like Nevr-Dull. CMA sells it, you can probably get it locally as well. :up
Taking my signature to it`s MAXIMUM POTENTIAL
-
10-05-2010, 11:55 PM #10Just a regular guy

- Join Date
- Feb 2009
- Location
- Oviedo/Stuart Florida
- Posts
- 15,278
- Post Thanks / Like
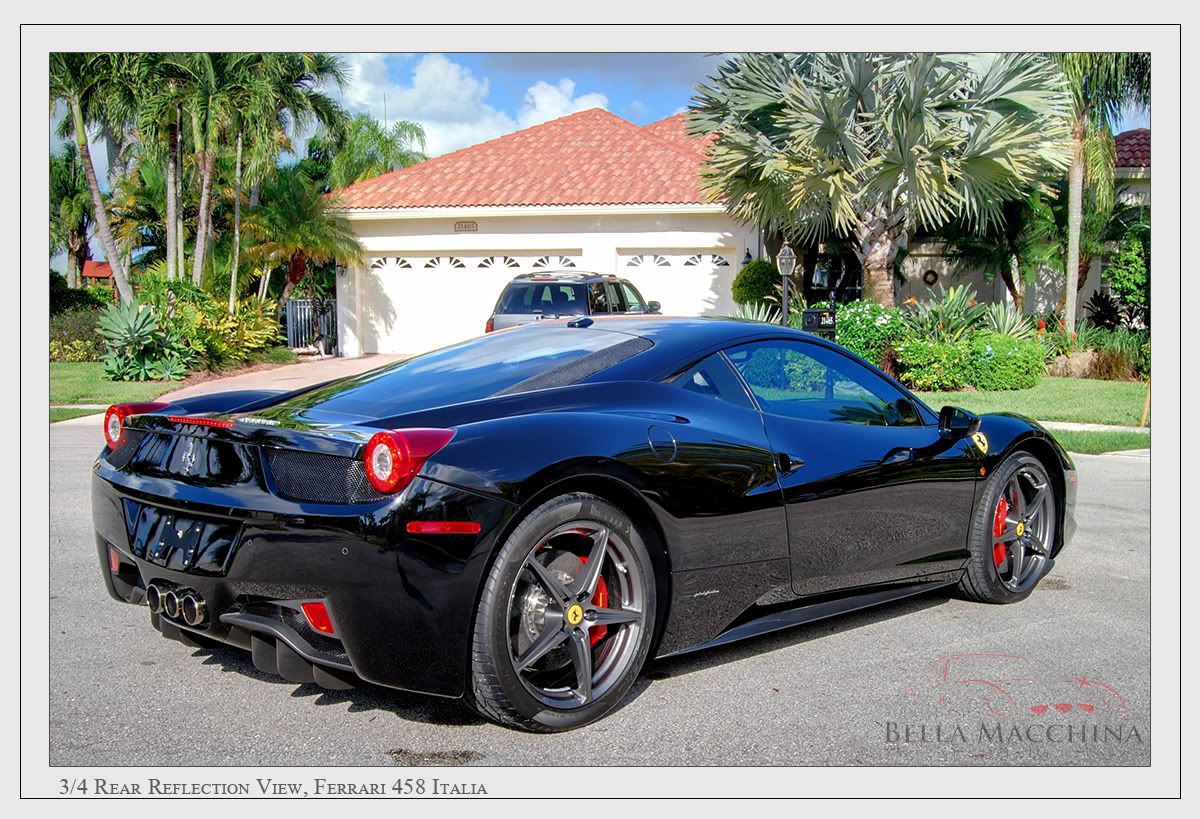
Ferrari 458 Italia: Full wet sand and detail in South Florida


-
10-05-2010, 11:56 PM #11Just a regular guy
- Join Date
- Feb 2009
- Location
- Oviedo/Stuart Florida
- Posts
- 15,278
- Post Thanks / Like
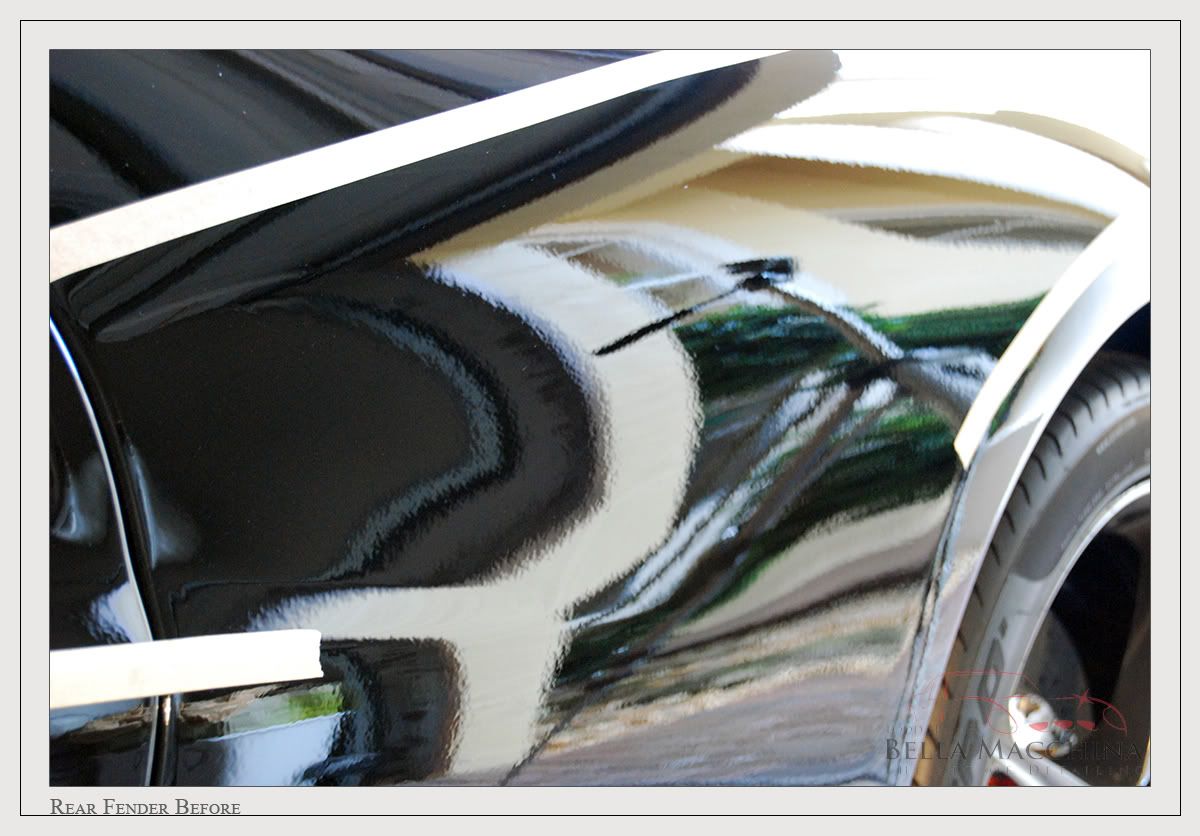
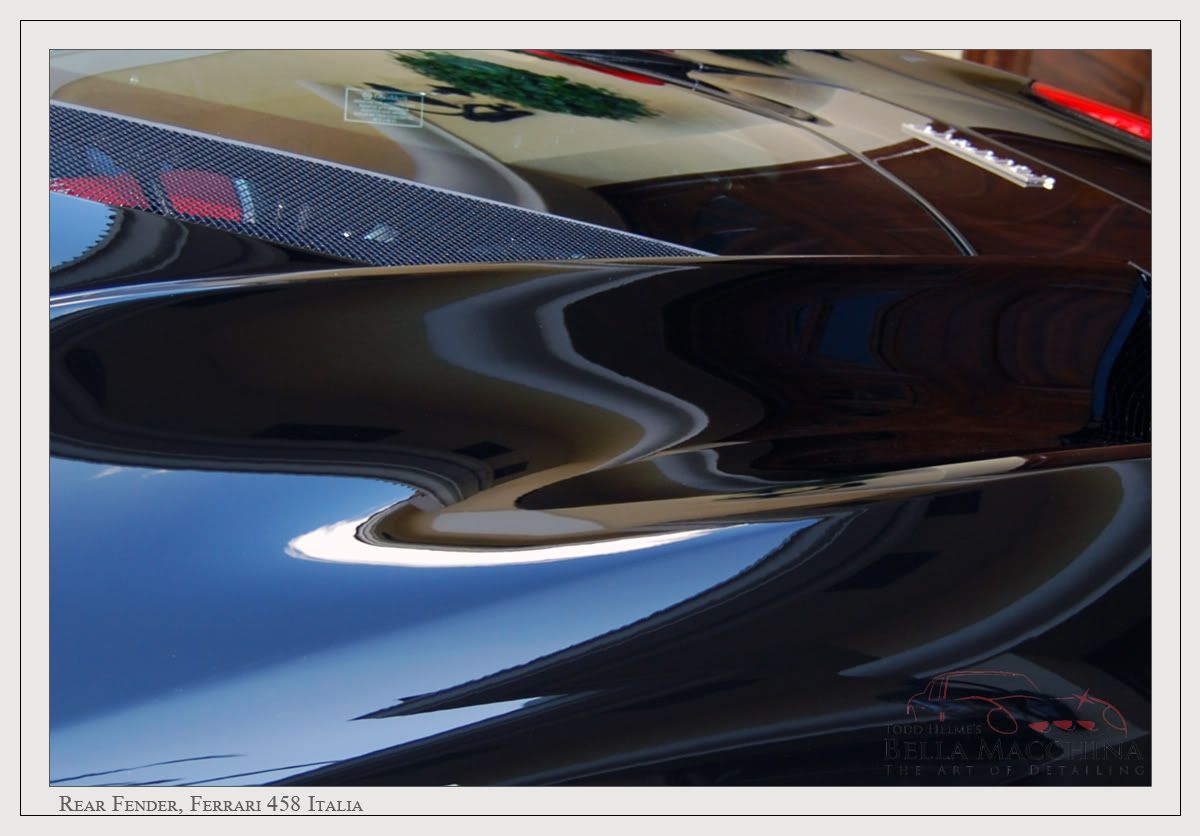
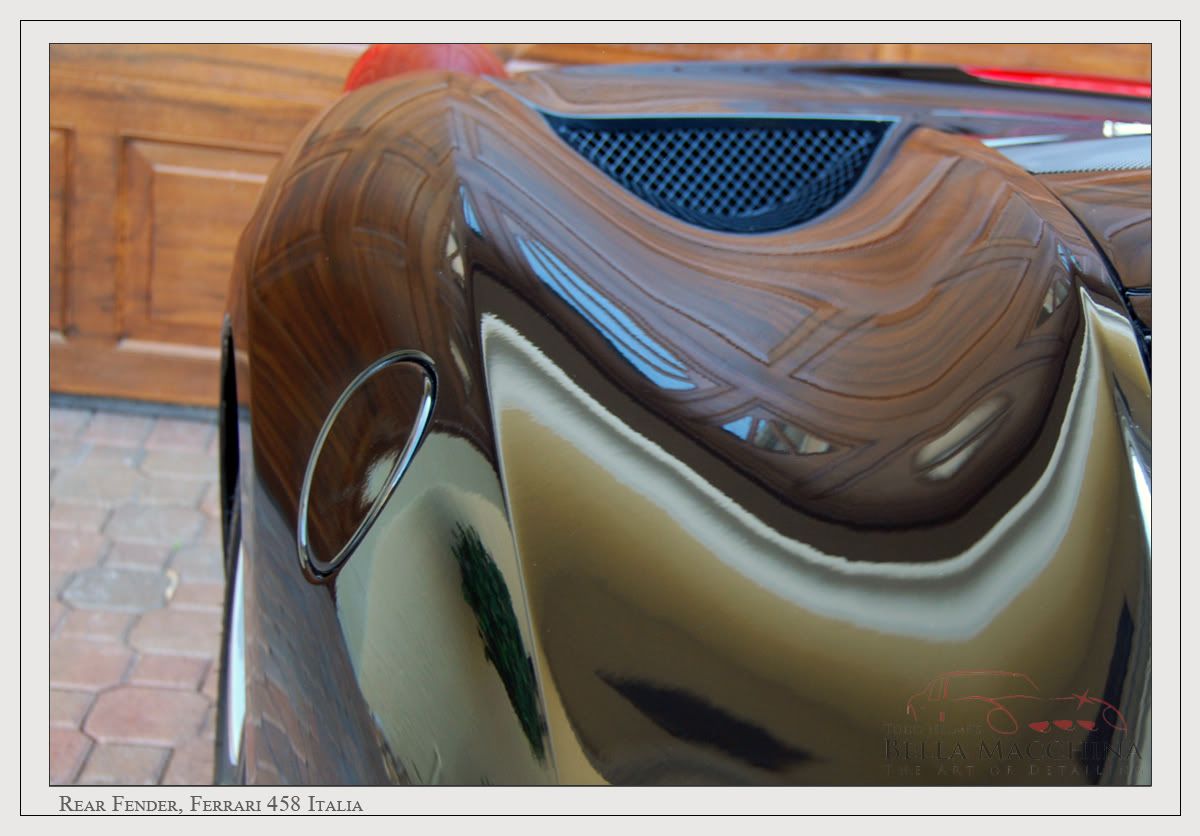
Before looking at the full sized after photos it is important to reflect with two full sized before photos.
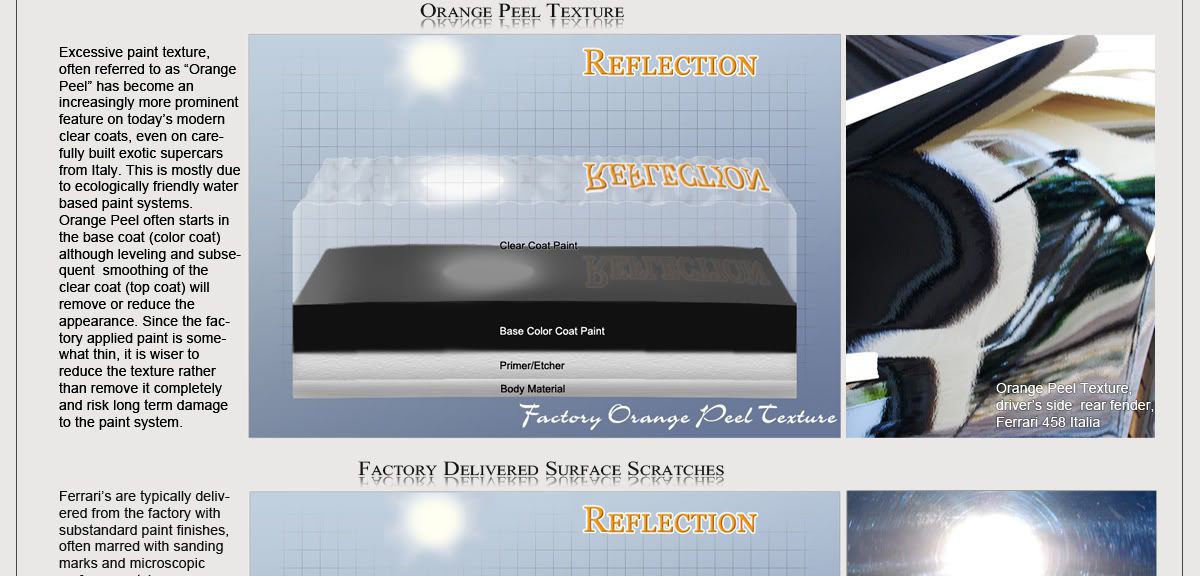
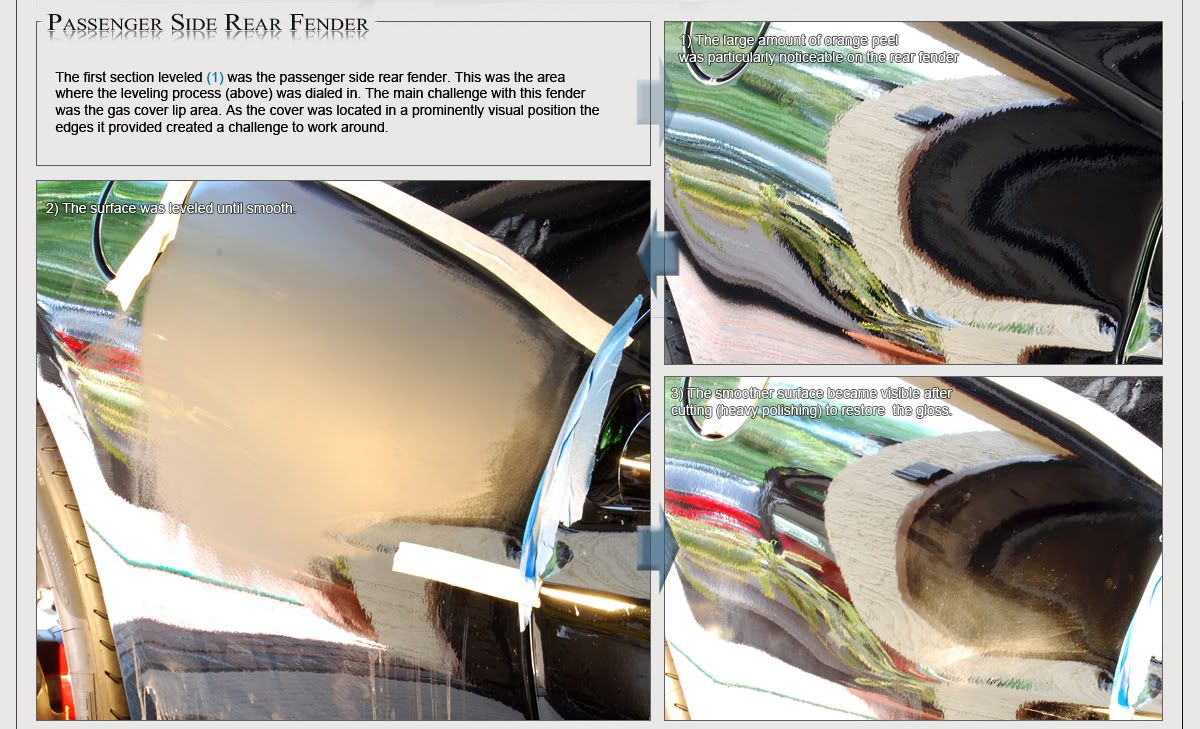
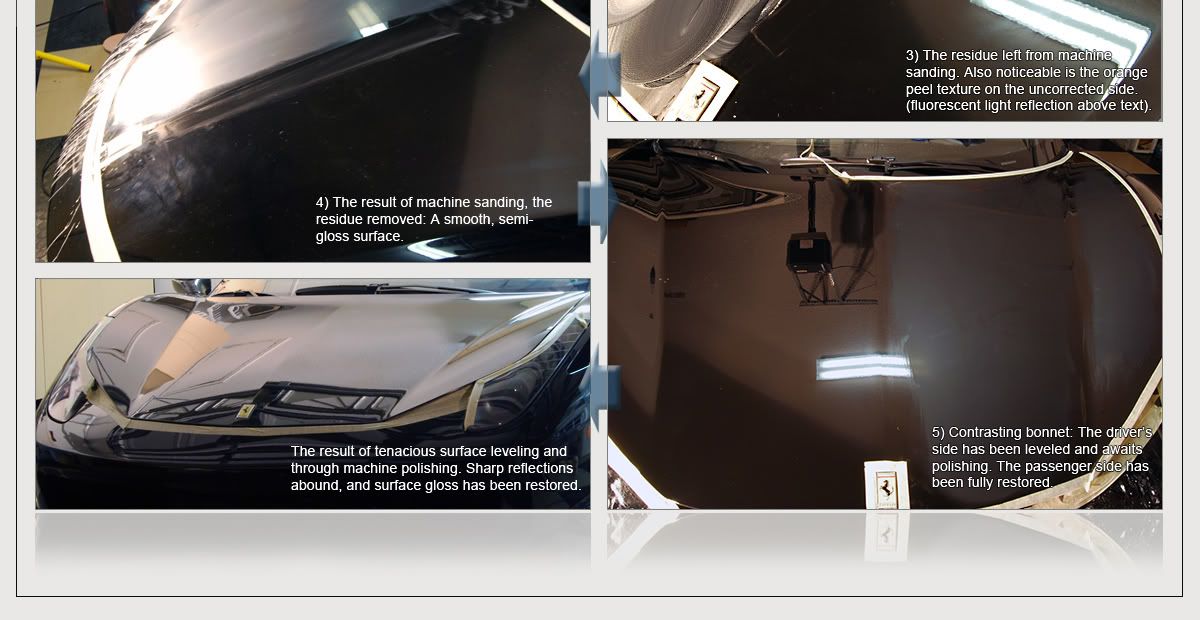
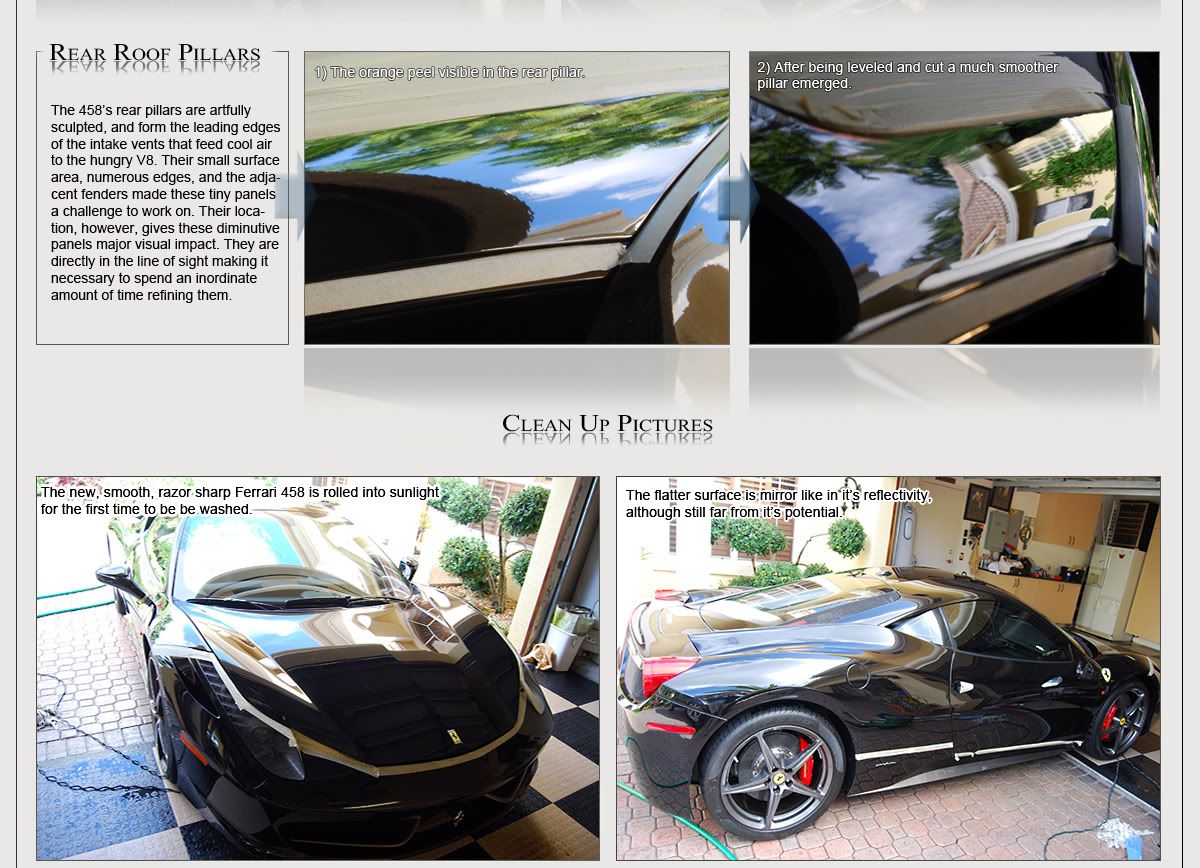
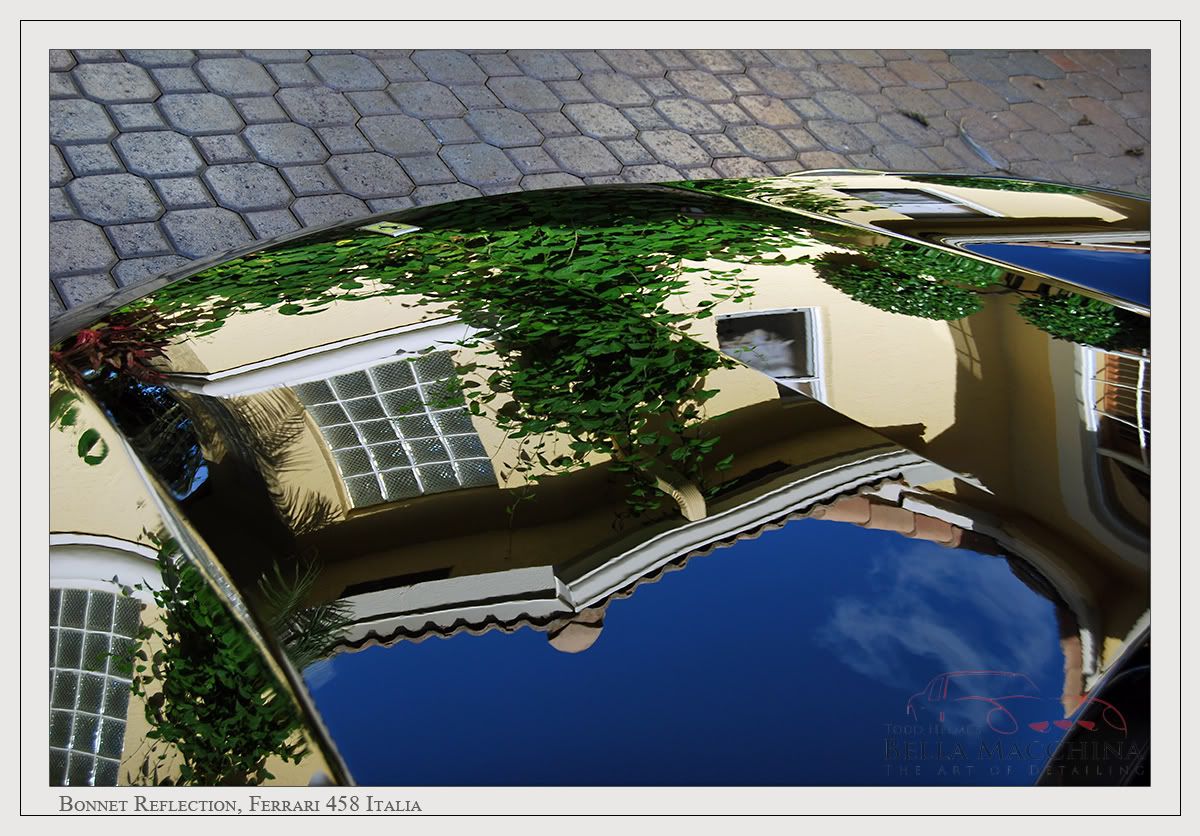
There was heavy orange peel over the Ferrari`s entire surface.

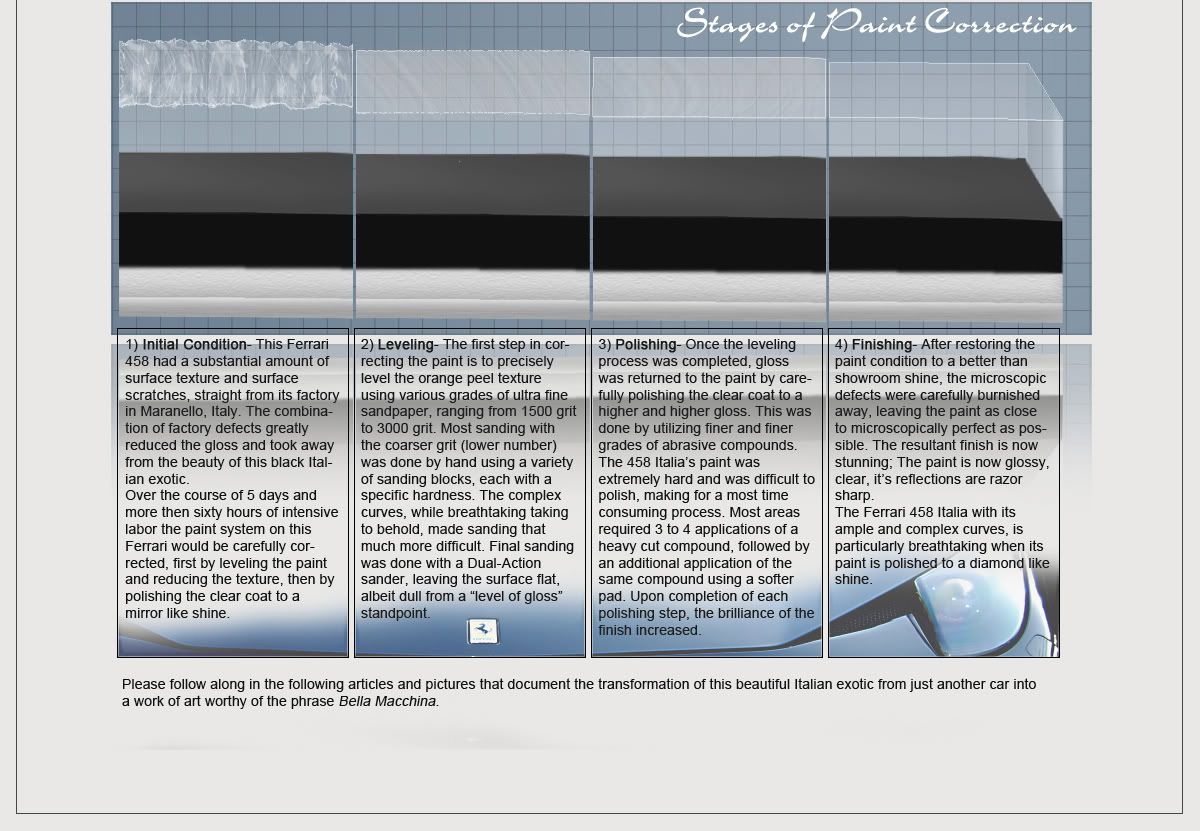
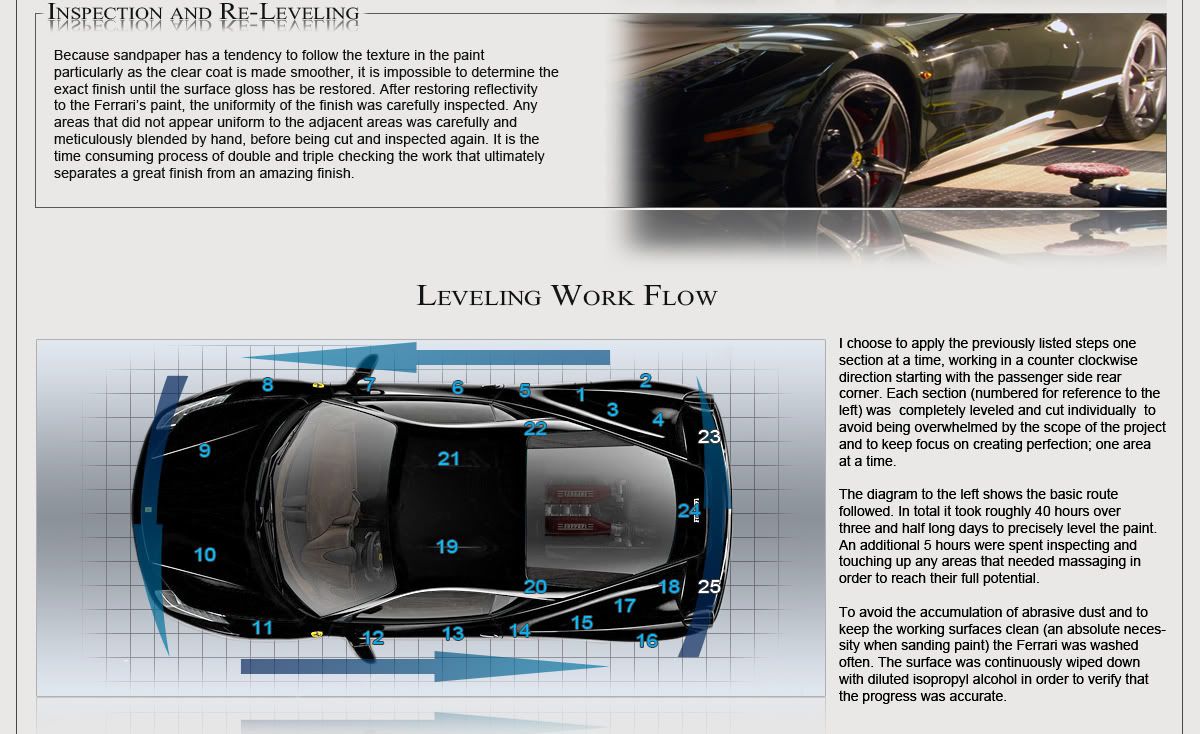
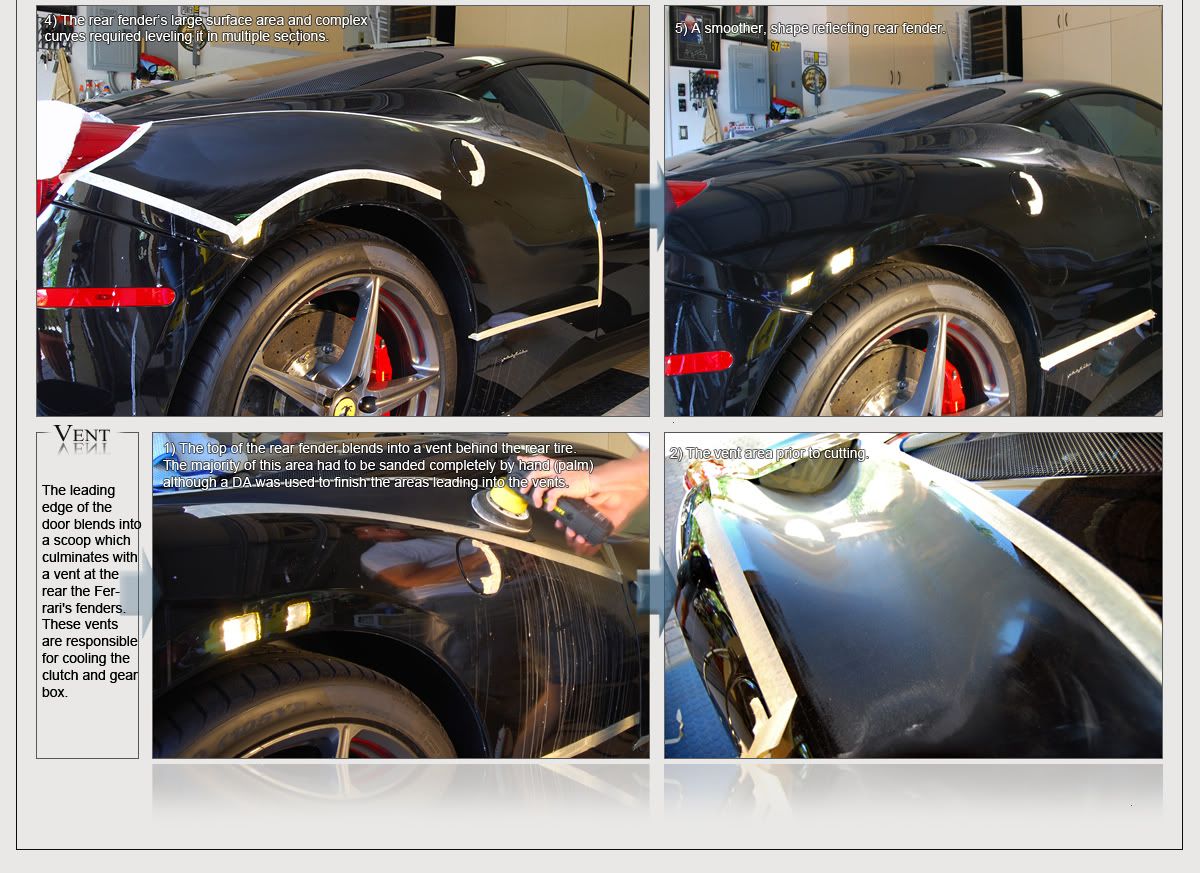
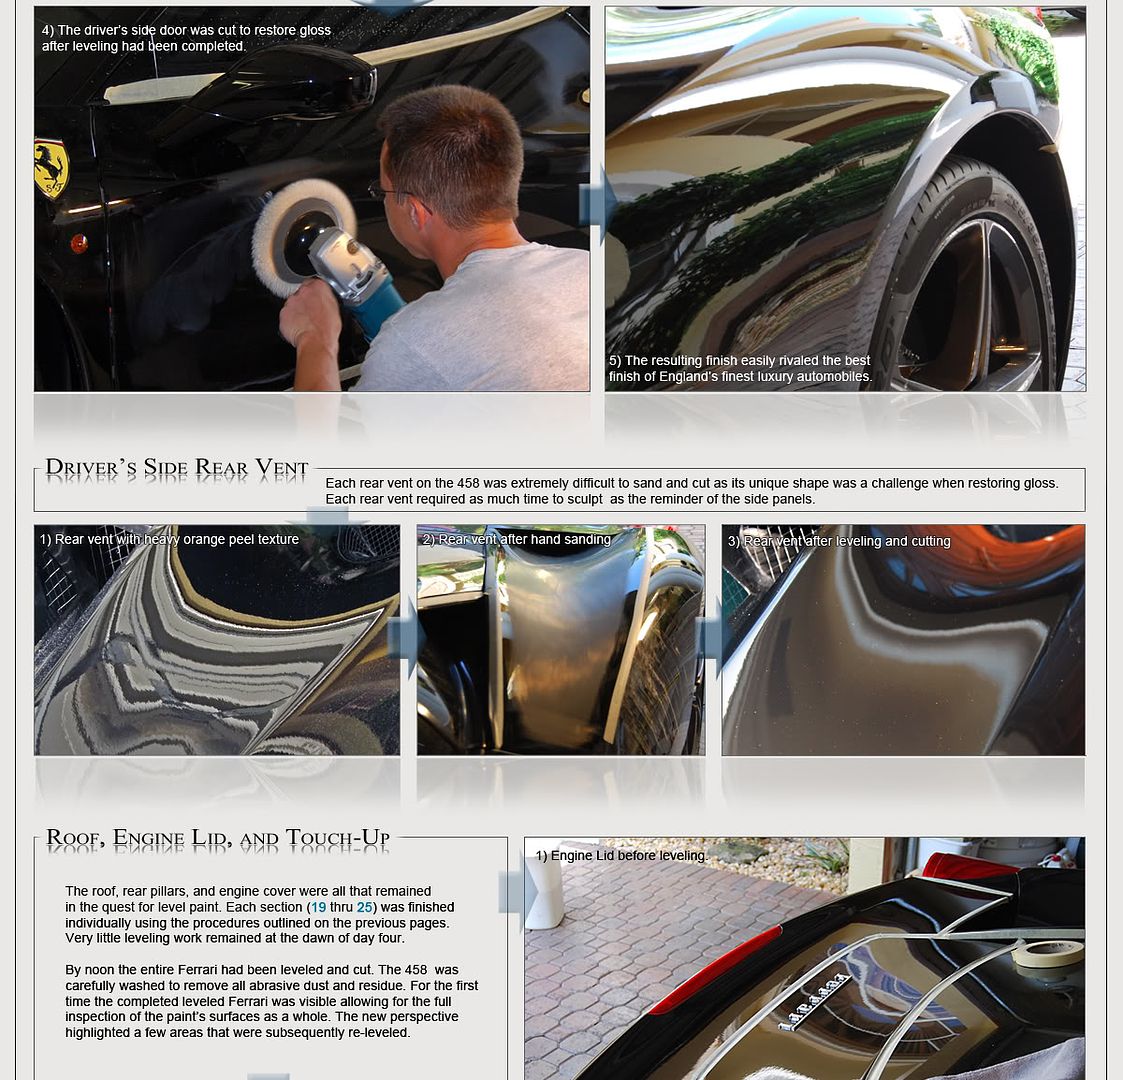
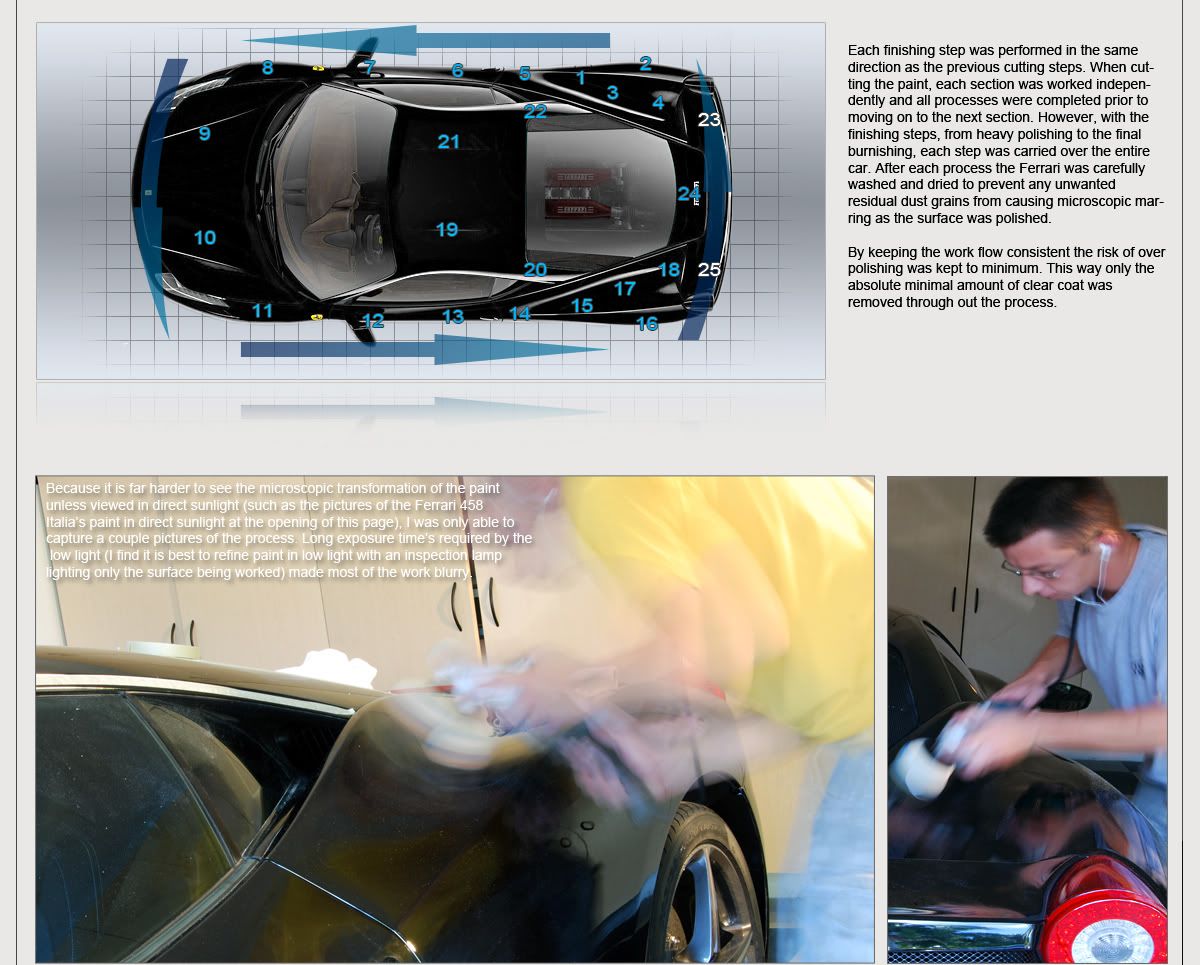
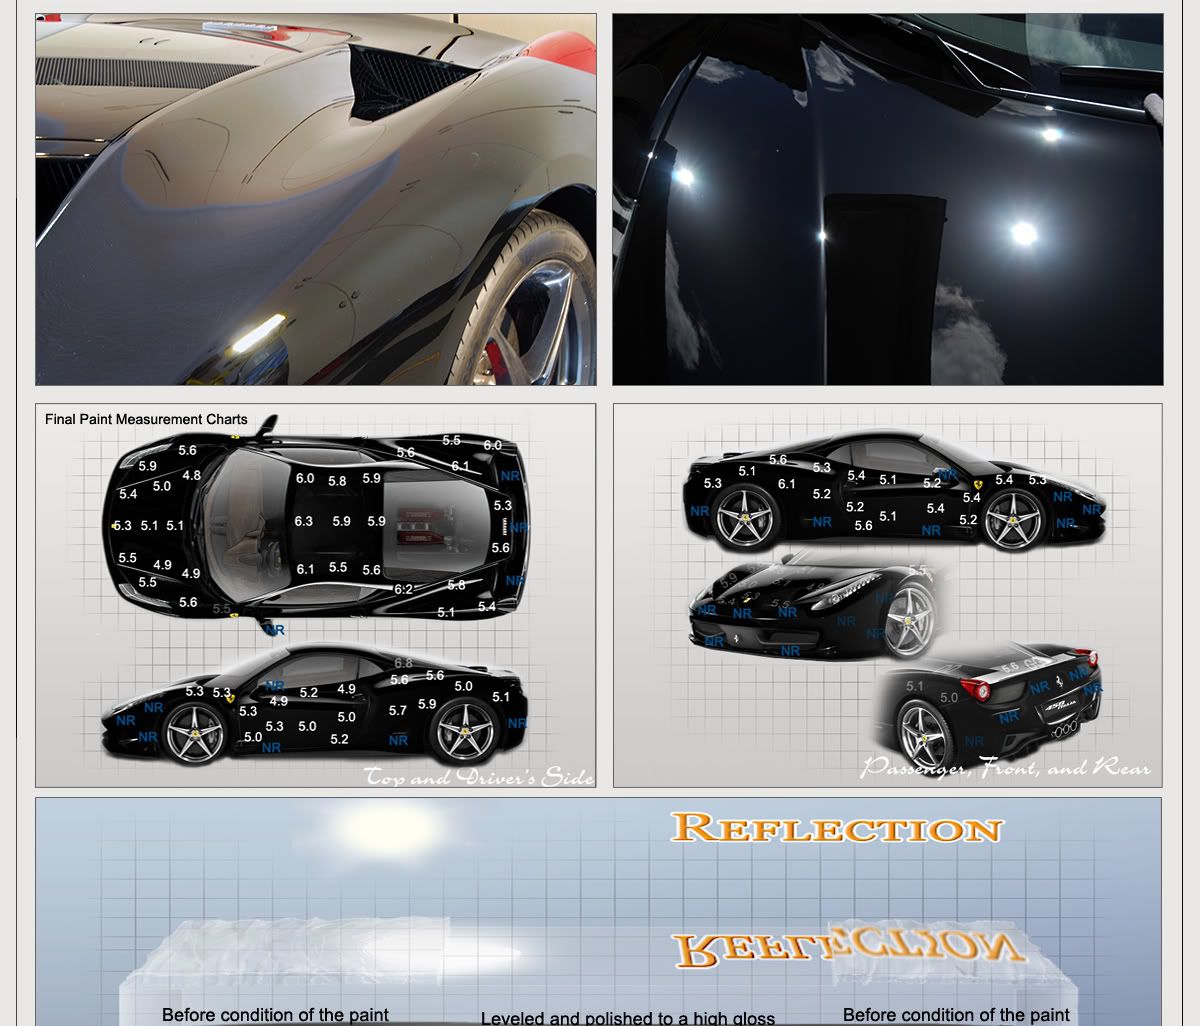
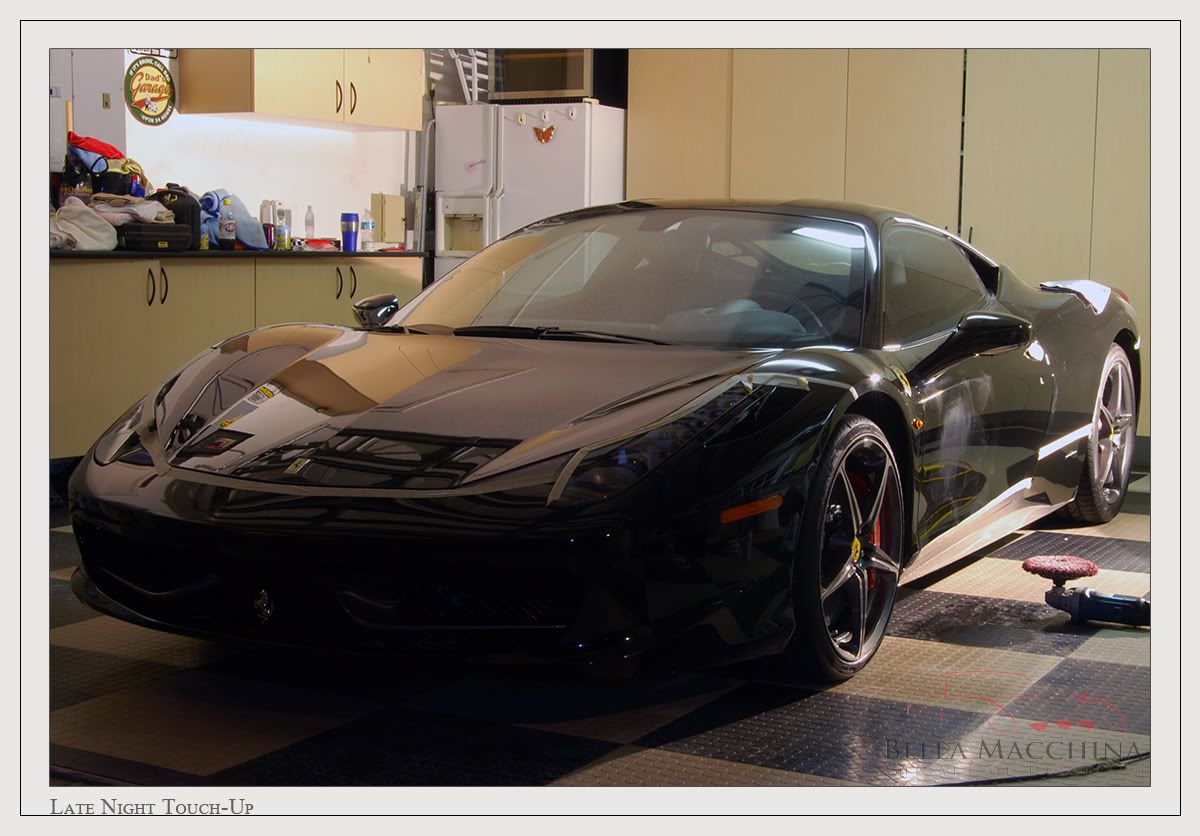
Here is an in progress shot taken of the 458 Italia prior to the end of day three. A lot of time was spent double and triple checking the progress and results. If there had been enough factory paint thickness to completely sand the body completely flat, this job would have been easier. As such the goal was to get as close to perfect as possible, which meant giving it a consistent and uniform finish everywhere. Over sanding and over flattening a small amount too much would have meant re-sanding the entire surface flatter as well to ensure total uniformity.
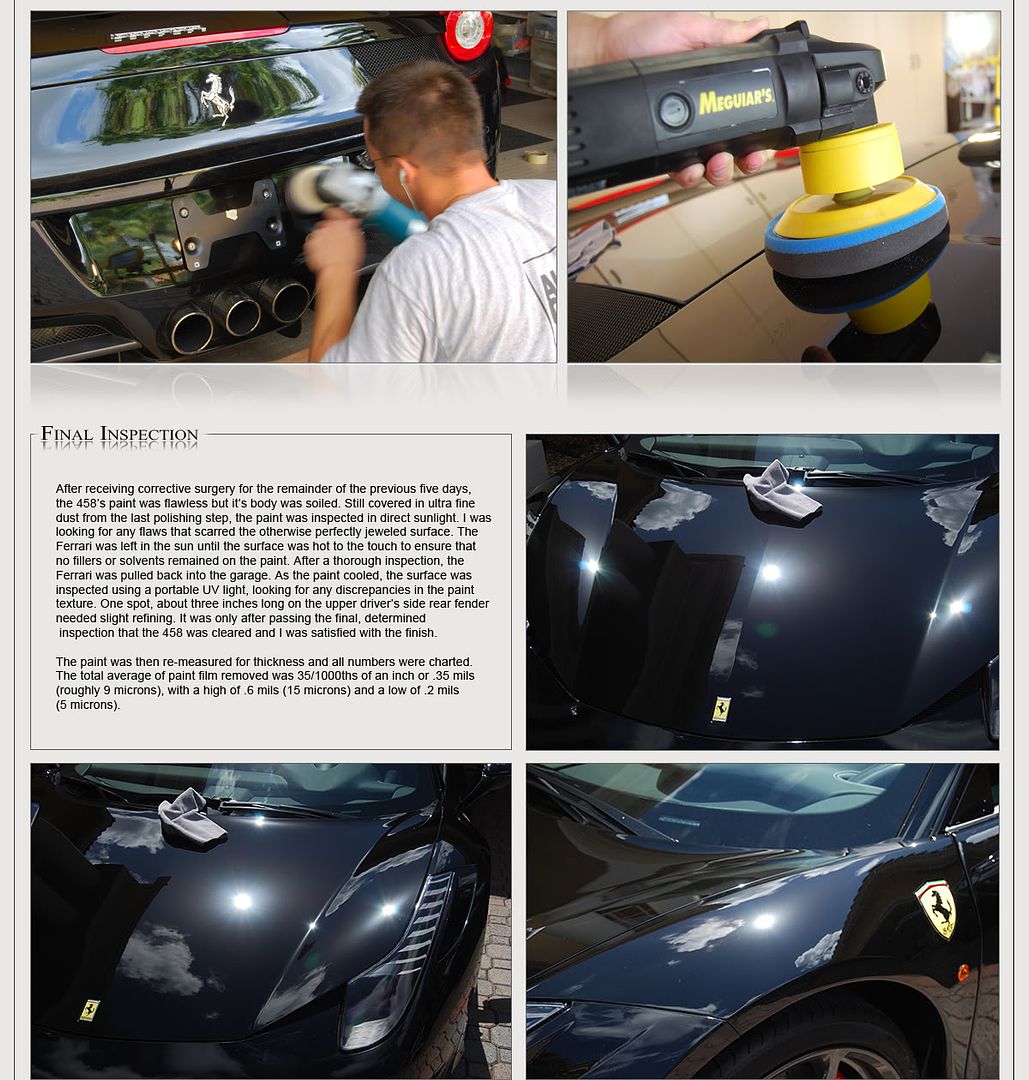
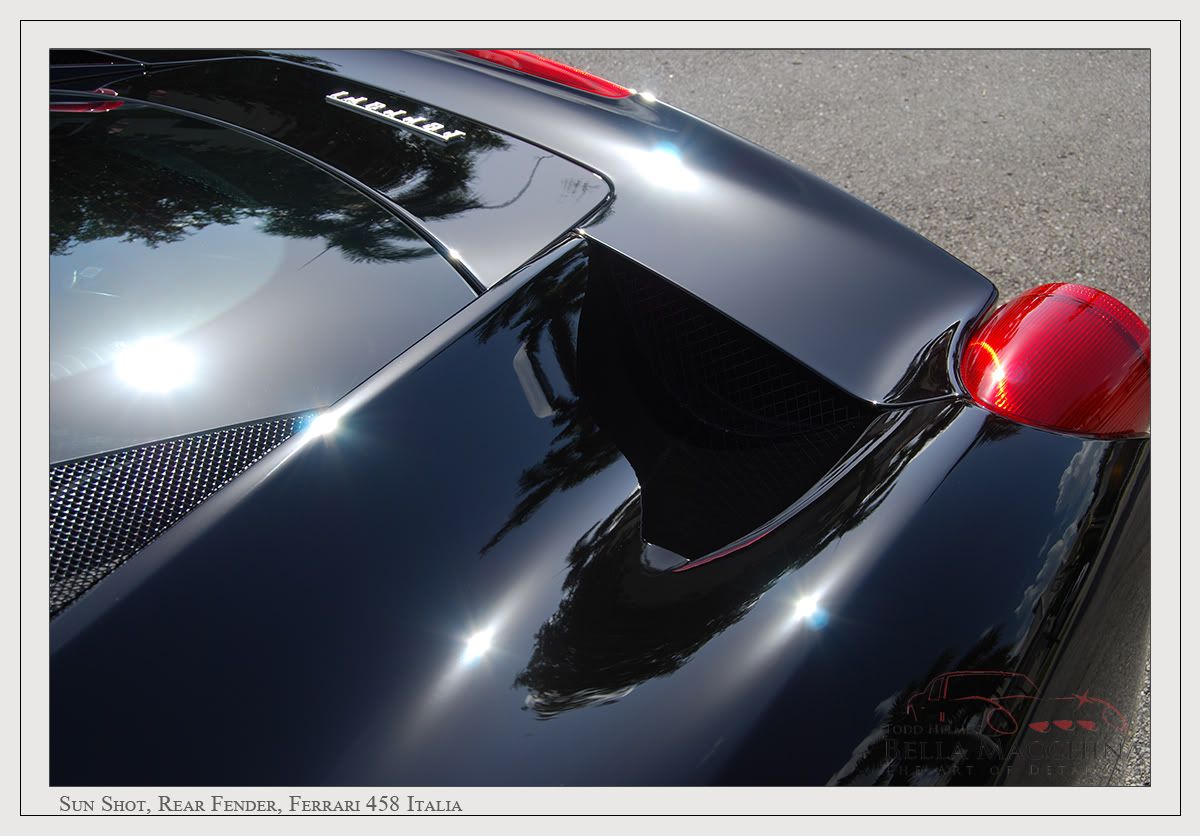
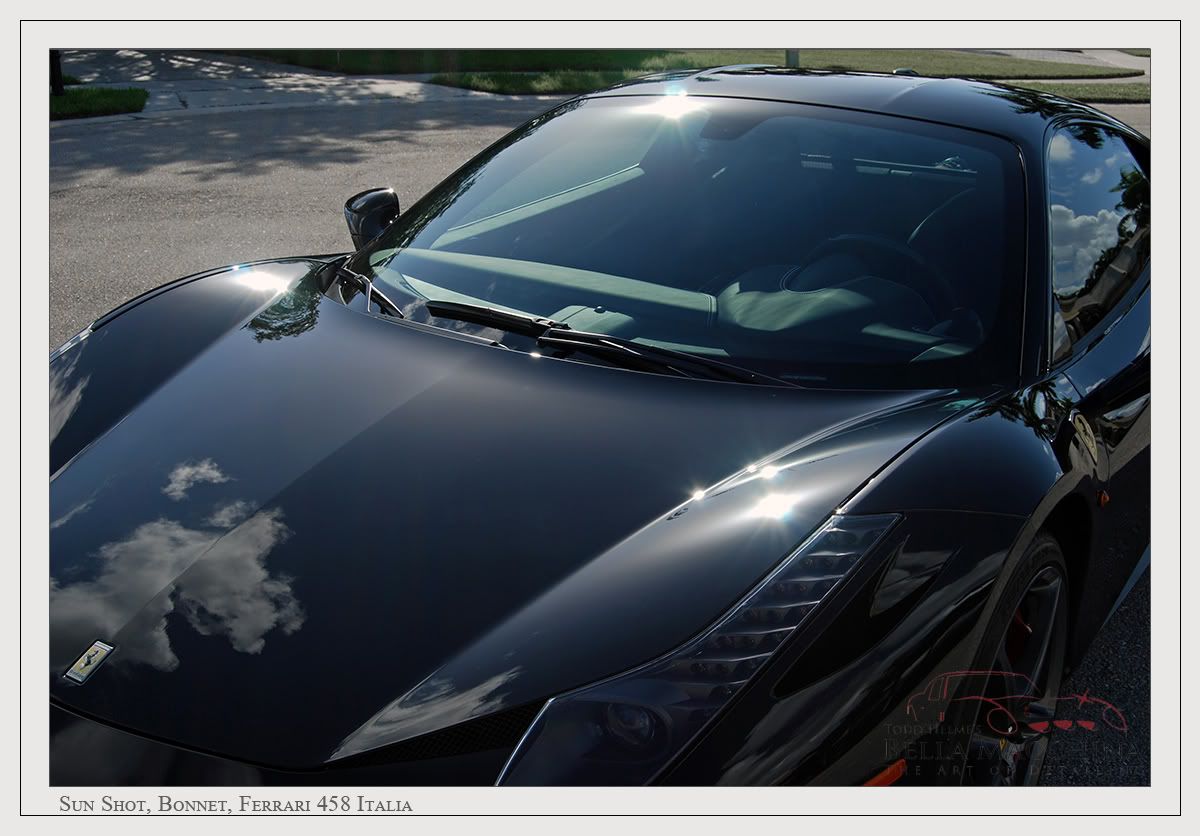
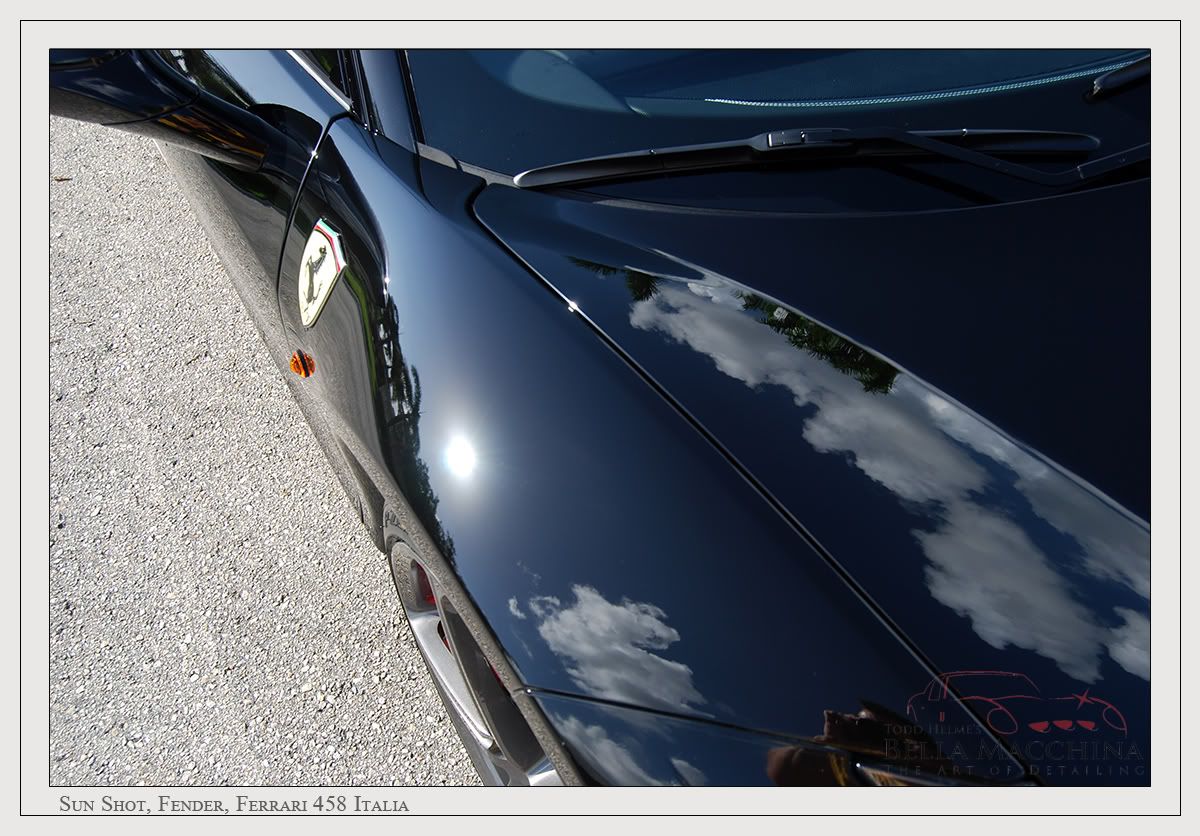
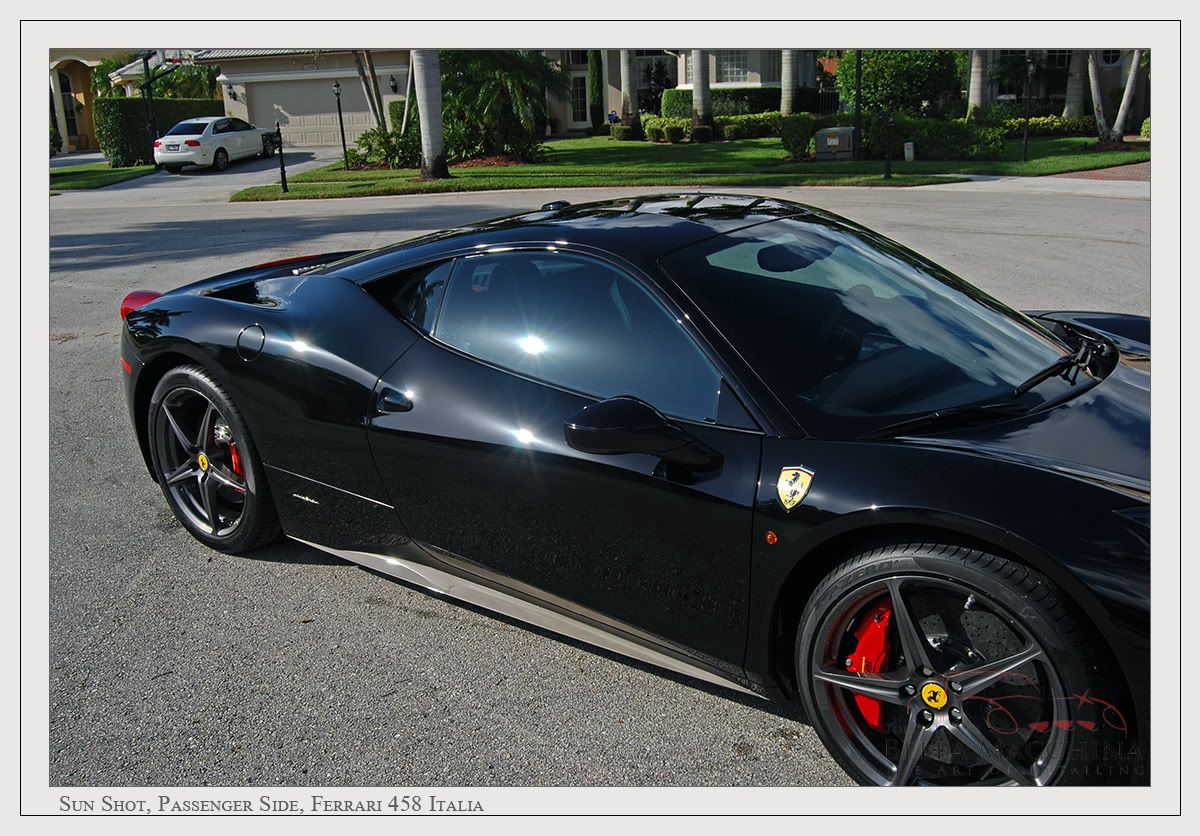
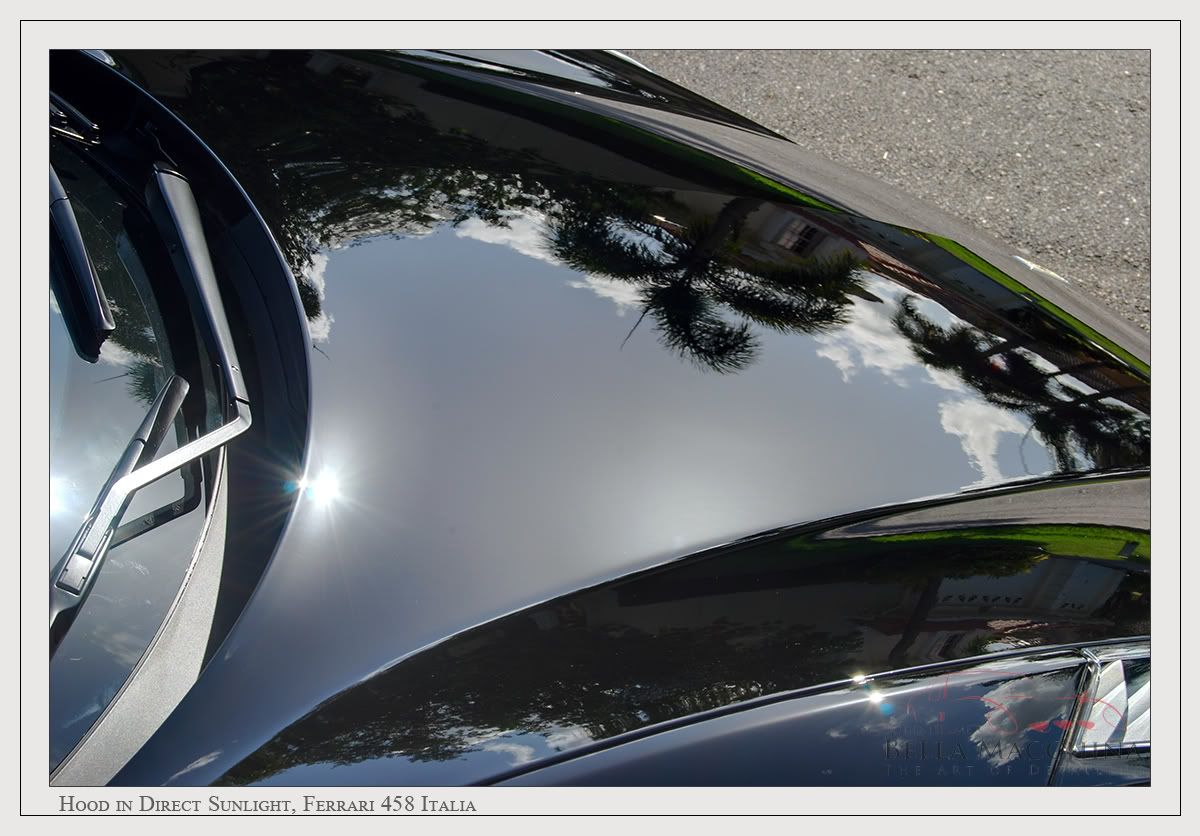
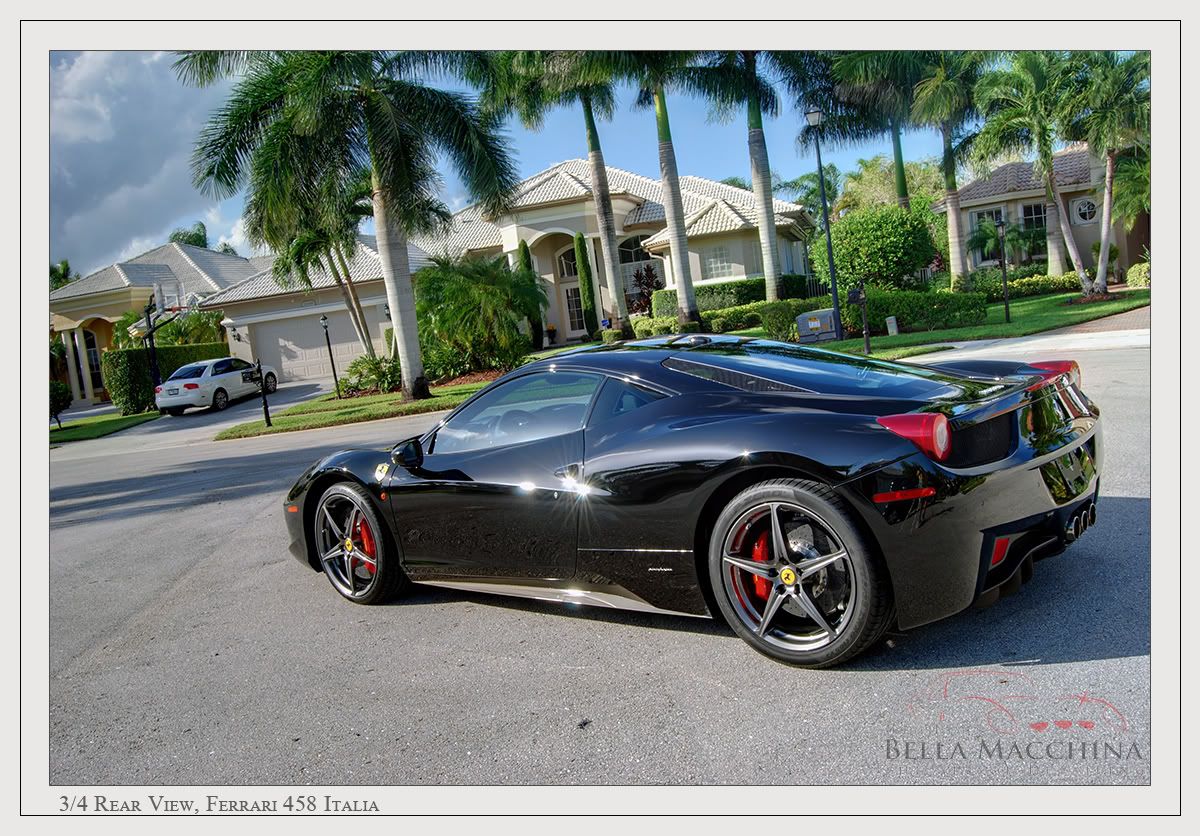
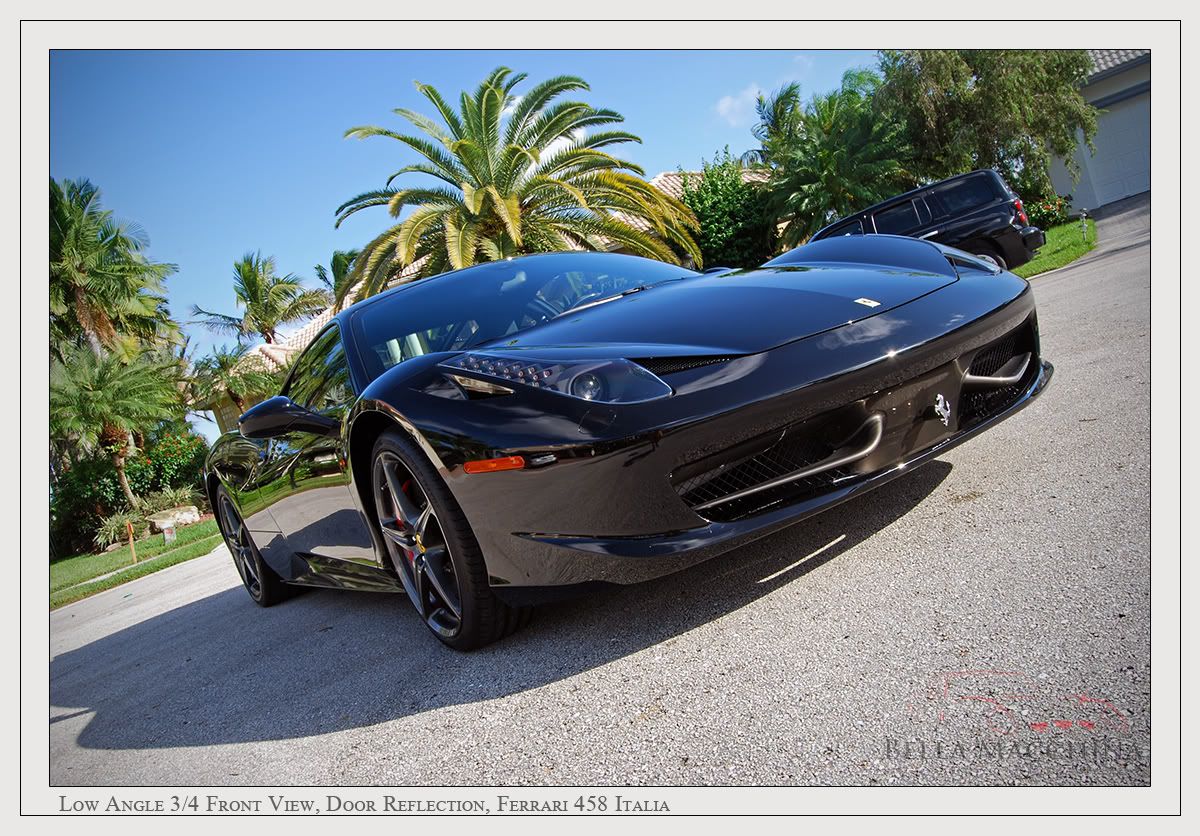
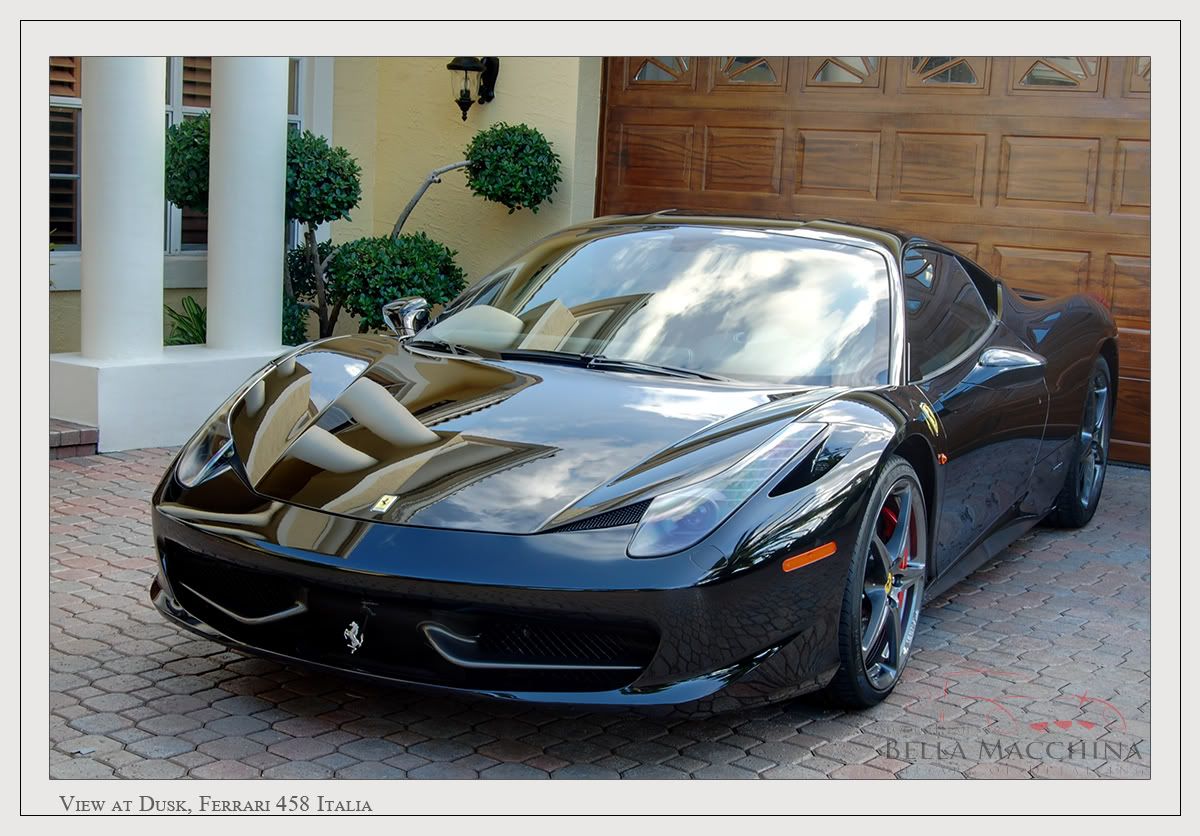
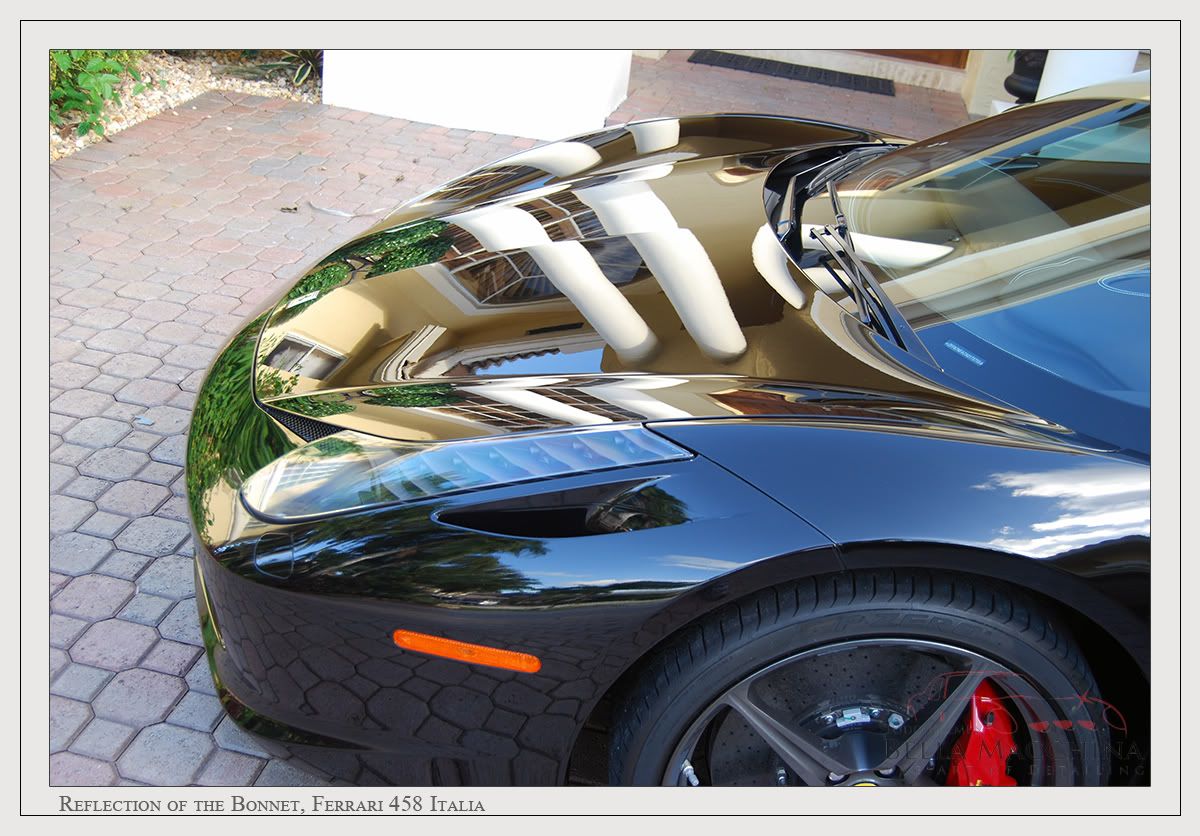
The remaining pictures are after shots, taken both in direct sunlight and in the shade close to the house. Thank you for reading.


I would also like to thank Kevin Brown for graciously taking the time to proof read this thread and for making many beneficial suggestions!
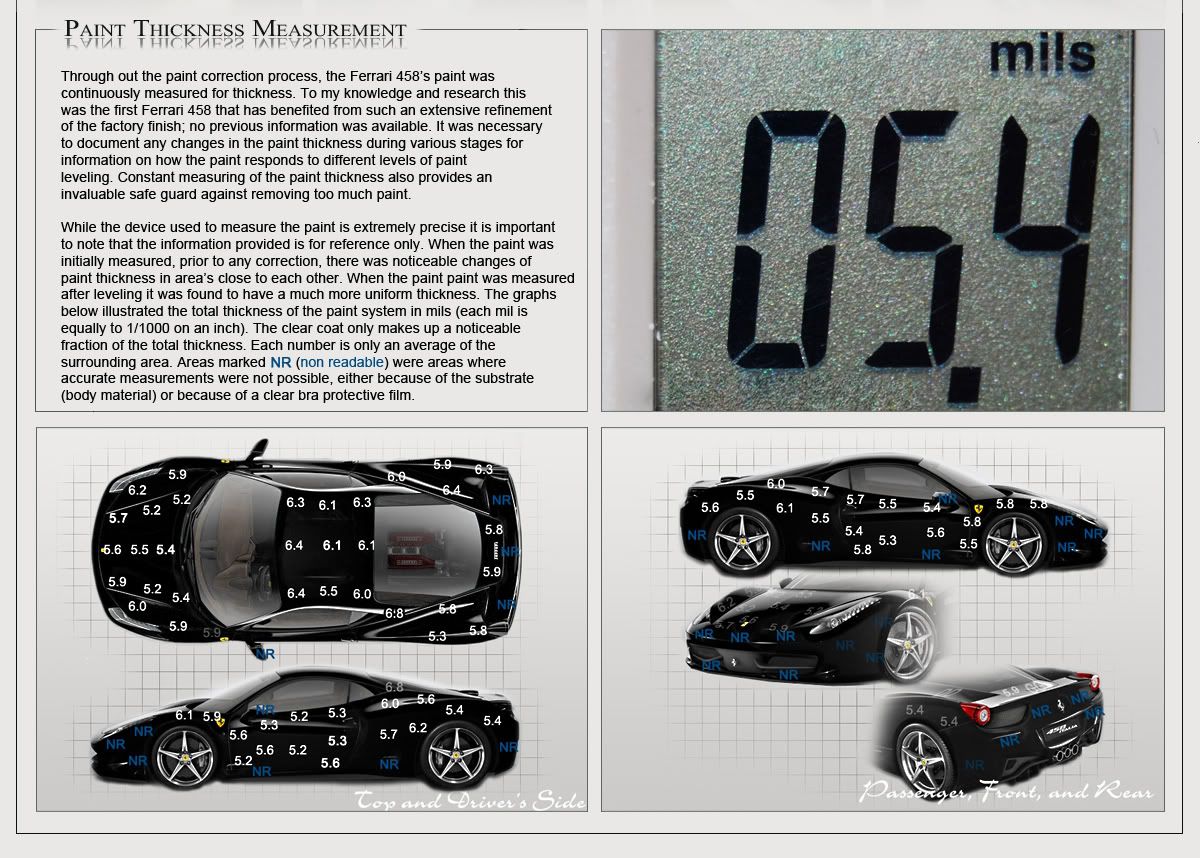
After Note:The picture of the mil gauge reading was borrowed from a previous write-up of mine but worked for the story line. Since I originally was writing this for my website, I used artistic freedom with that picture. All other pictures used on the write up and every description is 100% correct and was taken during the course of the write-up.
-
10-05-2010, 11:57 PM #12Just a regular guy
- Join Date
- Feb 2009
- Location
- Oviedo/Stuart Florida
- Posts
- 15,278
- Post Thanks / Like
Products Used
The Ferrari 458 Italia was originally washed with Blackfire Gloss Shampoo using an Australian Sheepskin Wash Mitt. For subsequent cleaning I used Dawn to help strip any residual polishing oils from the paint to aid in the inspection. Since the paint was going to get sanded, and never got more then dusty only one wash bucket (with prerequisite Grit-Guard) was used. I used a total of 4 Big Blue III Drying Towels over the 5 day detail.
The paint was clayed using Blackfire`s Poly Clay II and the associated Blackfire Clay Lubricant. After claying I used a sample of Aquartz IronX do remove any rust fall out.
The wheels and brake calipers were cleaned with P21s Wheel Gel. The wheel wells, tires, exhaust tips, and weather stripping was cleaned with Optimum Power Clean. I also used the Eimann Fabrik Wheel Woolies for the wheels, brake calipers, and many other tasks (cleaning the front vents, door jambs, etc).
Before leveling the paint I used Meguiar`s Masking Tape to mask off any edges and tape up any vents. Because many areas were re taped multiple times (as needed) I ended up using a full roll of the 3/4" tape and almost a full roll of the 1.5" tape
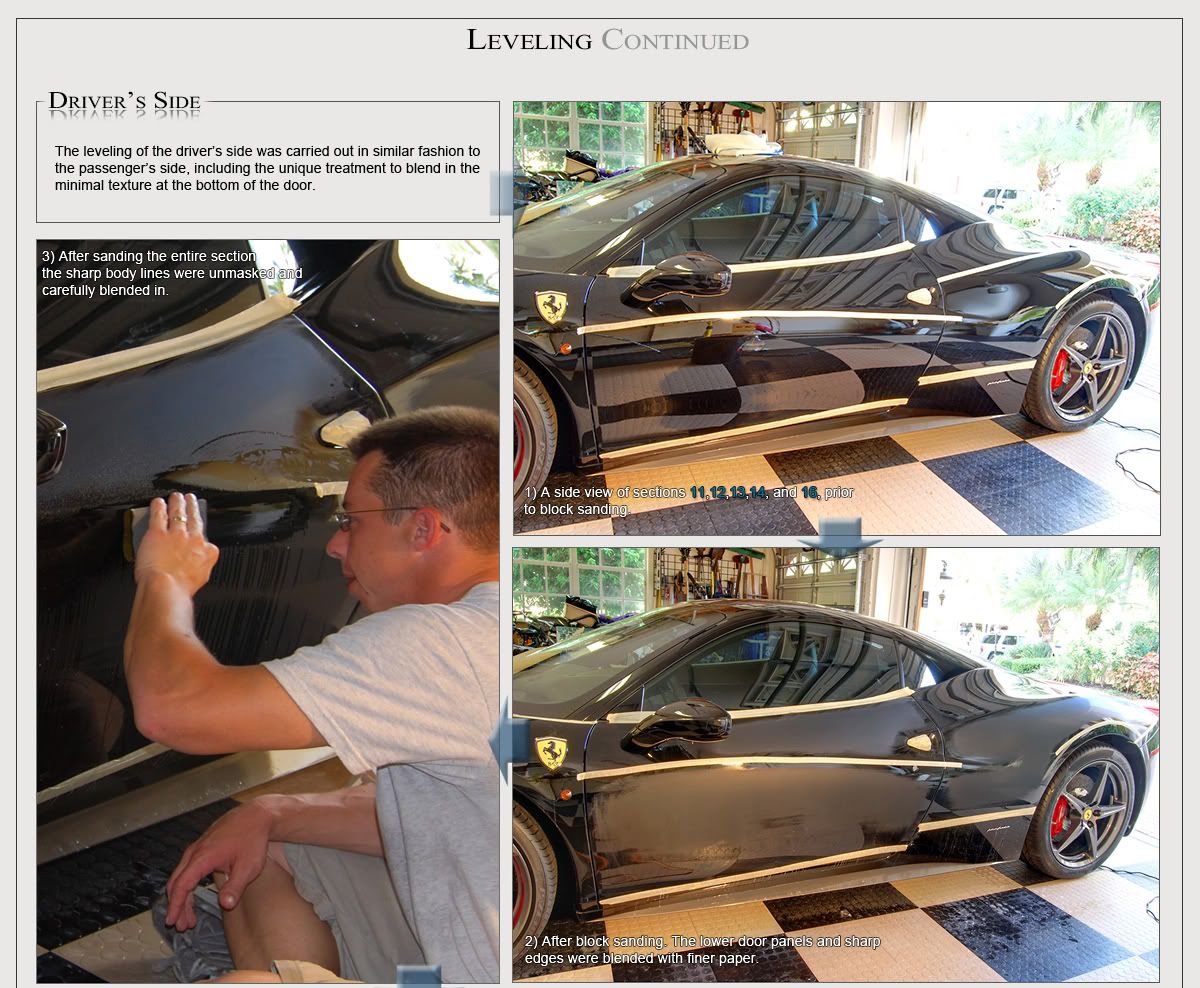
All of the sanding was done using Meguiar`s Professional sanding products. First the Ferrari was sanded with by hand using 1500 Unigrit paper. the sanded in a cross hatch pattern with 2000 grit.
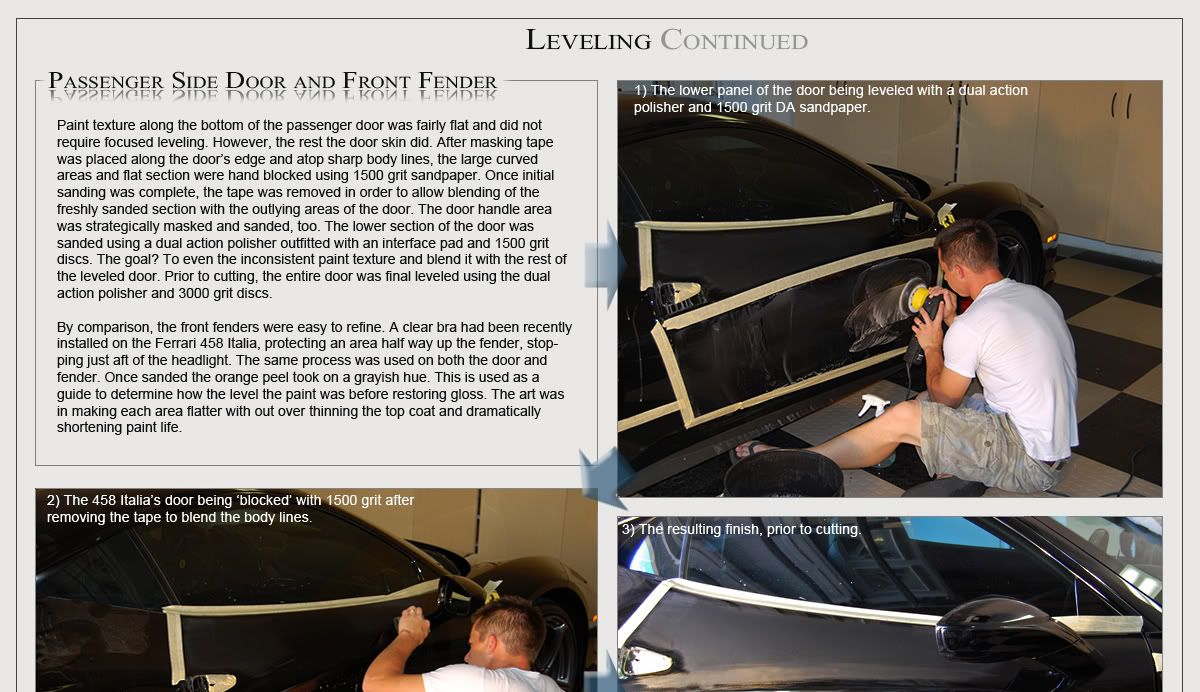
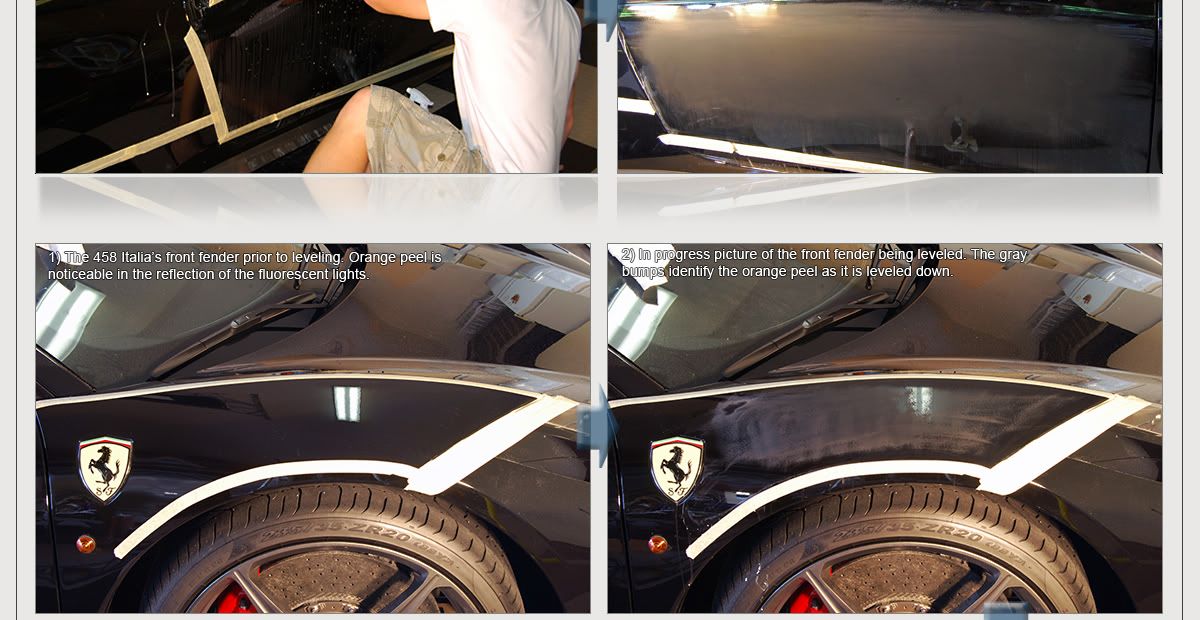
Prior to use the sanding papers were allowed to soak in a bucket for at least 15 minutes to soften them. I added a couple drops of Optimum No Rinse to both the water bucket and the spray bottle to increase the lubrication as well as help float away any abrasive material that had been worked loose. A variety of sanding blocks were used on the the flatter panels (different sizes and hardness) but most of the Ferrari required using the palm of my hand to avoid the paper from gouging the finish. The lower sections of the door skins were sanded with Meguiar`s 1500 grit finishing disks with a Meguiar`s interface pad.
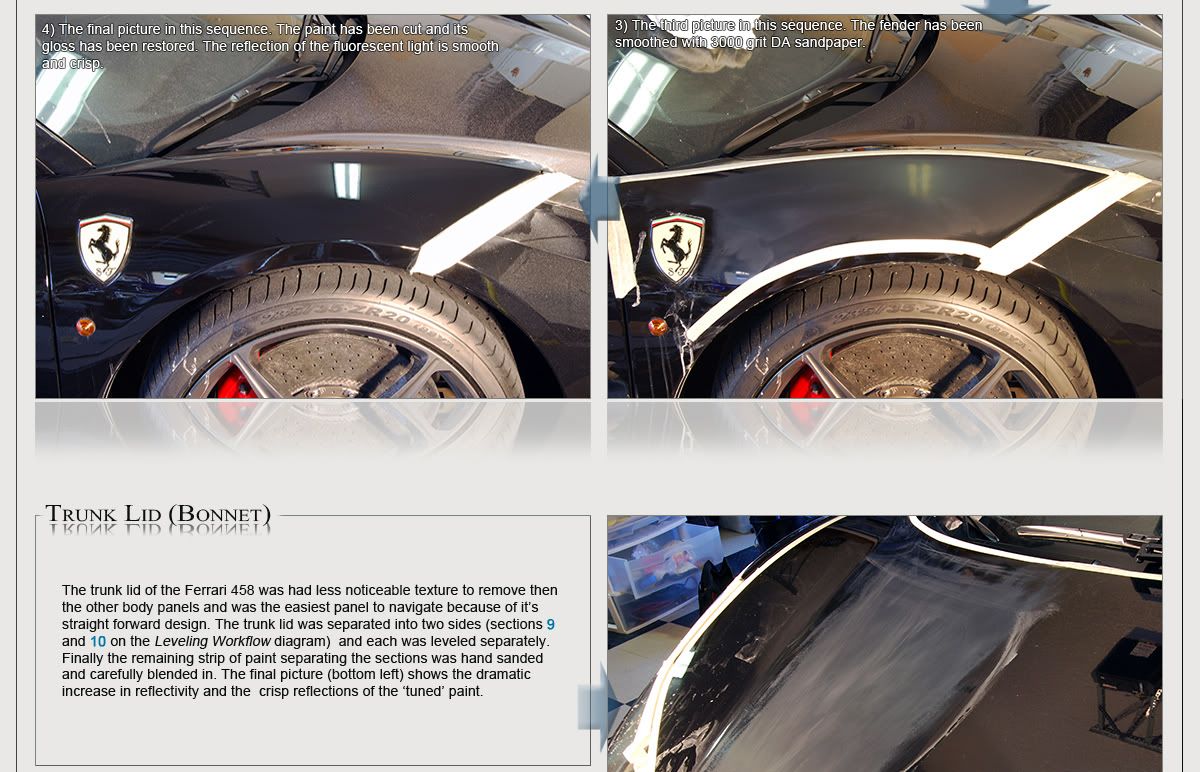
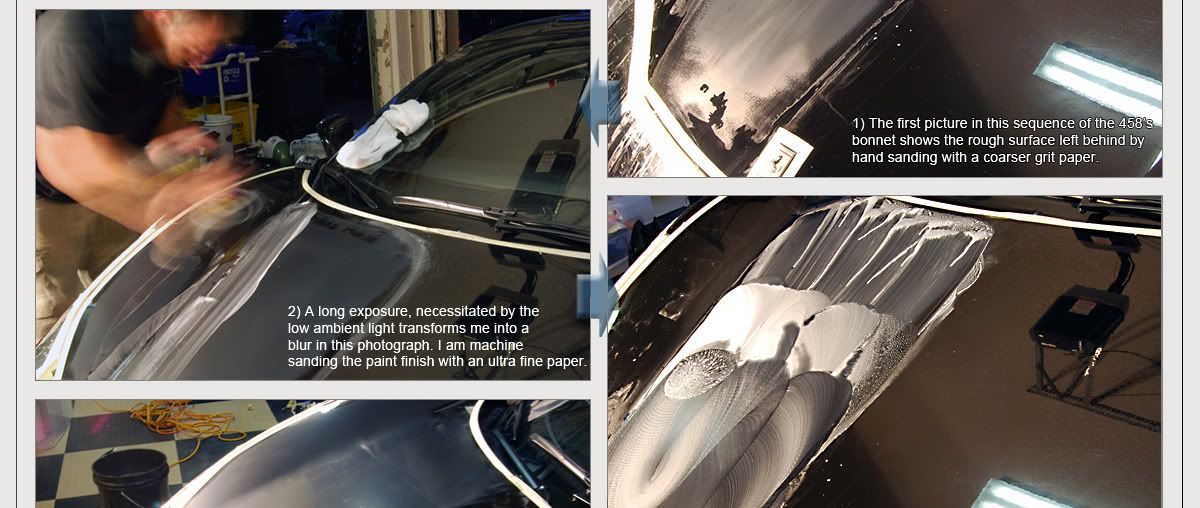
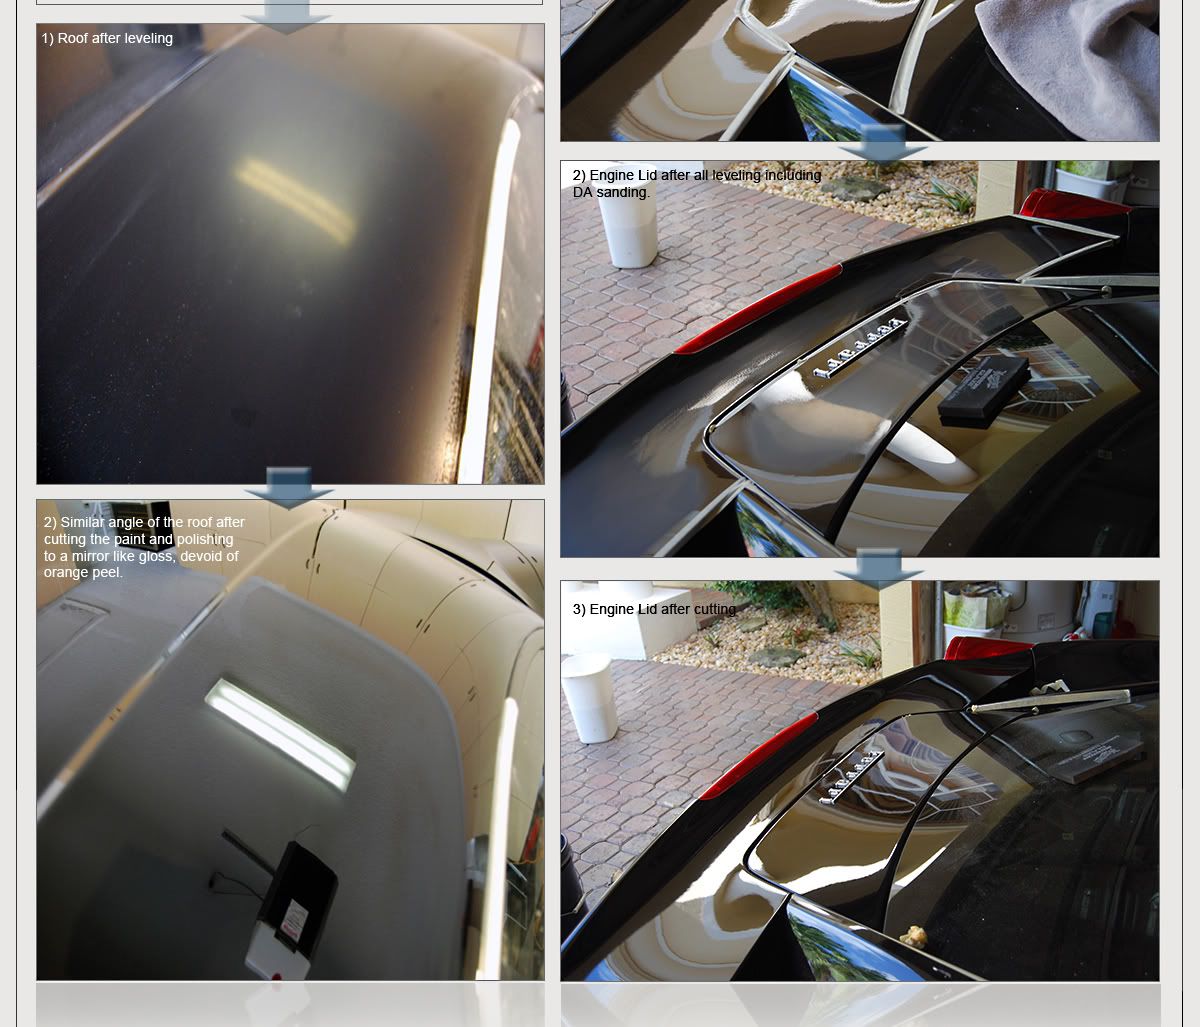
Final sanding was carried out on a Meguiar`s G110v2 Dual Action Polisher with 3000 grit finishing disks and a foam interface pad. Any areas were too curved for machine sanded were final sanded by hand using Meguiar`s 3000 grit sanding sheets.
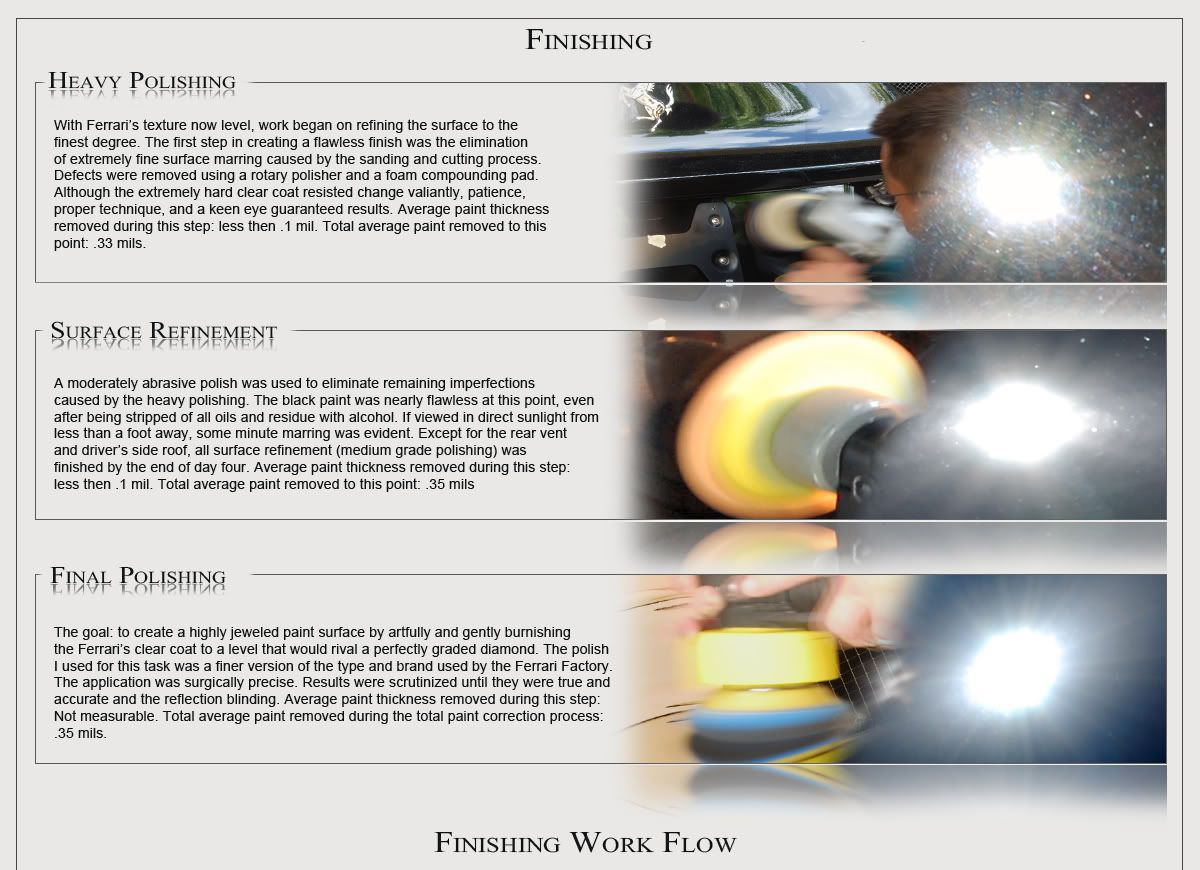
The initial step in compounding the paint was to use Meguiar`s M105 Ultra Cut Compound on a Meguiar`s So1o Burgundy Wool Pad. The hard paint required 3-4 passes (in most areas) to fully remove sanding marks and texture. Several pads were used and they were brushed after each section. After cutting with the wool pad I had some fairly noticeable polishing marks. Meguiar`s M105 was once again used, only this time with a Meguiar`s Soft Buff 2.0 Foam Cutting Pad. All of this work was carried out a section at a time. Both a Meguiar`s 3.5 Inch backing plate and Meguia`rs excellent So1o Backing plate were used depending on the size of the pad.
The last two polishing steps were carried out using a dual action polisher. The first step was Menzerna PO83 Super Intensive Polish using Lake Country Tangerine H20 low profile pads. The finishing polishing step was carried out with Black Classic Flat Polishing Pads and a beta polish.
One of my fears in this detail was the number of towels I would have to go through, from wiping away sanding residue, to wiping off the final polish, to removing the last layer of wax. I had bought a bundle General Purpose Microfiber Towels (36) and it was the best choice I made. These towels do not mark paint (like other budget minded towels) and having a fresh on on hand for any task was great.
After polishing, cotton swabs and Optimum Power Clean were used to remove anything and stubborn residue. The final protection came from Blackfire`s Wet Ice over Fire combination kit, which includes the Blackfire Wet Diamond All Paint Protection and Blackfire Midnight Sun #24 Carnauba Wax. Two coats of Wet Diamond were applied with a dual action polisher and Lake Country Gold foam pad. The wax was applied and removed wet using a foam applicator.
Blackfire Tire Gel was used on the tires, applied carefully. The wheels and brake calipers were coated with Wheel Wax. The wheel arches were dressed with Meguiar`s Hyperdressing, which was applied to the towel before application to avoid any spray getting near the absorbent carbon-ceramic brakes. All of the glass was cleaned with Glass Science Rain Clear including the engine cover. The trunk and engine was wiped down with Optimum No-Rinse, and all rubber trim was protected with Wurth`s Rubber Stick. Finally the exhaust tips were polished with Optimum Metal Polish.
-
10-06-2010, 12:10 AM #13
- Join Date
- Jan 2002
- Location
- Atlanta, GA
- Posts
- 8,402
- Post Thanks / Like
Todd, So did you spend more time making the paint stunning or putting together the most informative writeup ever?
Bryan Burnworth - Atlanta Car Detailing - Peachstate Detail LLC
Selected as one of the top nine detailers in the US by Autoweek
Published in the 356 Registry
The only exclusive Opti-Coat Pro specialist in Atlanta
All PPF work done by the best in Atlanta Derek Johnson of Atlanta Protective Films
Follow Peachstate Detail LLC on Facebook here.
-
10-06-2010, 01:54 AM #14
- Join Date
- Jul 2010
- Posts
- 11
- Post Thanks / Like
incredible write up
that car looks amazingDonald Fazekas
Concours Detailing
Montgomery, Alabama
-
10-06-2010, 04:31 AM #15
- Join Date
- Sep 2010
- Posts
- 320
- Post Thanks / Like
Wow!!!
The car is pure perfection. That is one lucky dude who has the means but also has the knowledge to get you to perfect it!
Thanks for taking the time to photo document. Can wait to see the product list.

 Reply With Quote
Thread Information
Users Browsing this Thread
There are currently 1 users browsing this thread. (0 members and 1 guests)
Similar Threads
-
Ferrari 458 Italia: Full wetsand, orange peel leveling and paint perfection.
By Todd@RUPES in forum The Detailers ShowcaseReplies: 10Last Post: 08-09-2011, 10:39 PM -
Ferrari 458 Italia: Wet Sand and Detail in South Florida (orange peel removal)
By Todd@RUPES in forum Click & Brag -The Detailers ShowcaseReplies: 41Last Post: 06-16-2011, 07:26 PM -
Ferrari 458 Italia: Full wet sand and detail in South Florida
By Todd@RUPES in forum Click & Brag -The Detailers ShowcaseReplies: 2Last Post: 10-06-2010, 12:39 AM -
Sneak peak of the latest project... full wetsand/ Ferrari 458 Italia
By Lone Wolf in forum The Detailers ShowcaseReplies: 31Last Post: 09-26-2010, 11:45 PM
Bookmarks